Friday, May 22, 2015

open studio ... good to go !

ok, after a couple days of cleaning and organizing, we're good to go for open studio #23 ... we've got some things to see, some things for sale, and the cleanest shop since this time last year.  i whine and moan about how much time it takes, but it always feels good when we are really clean (for us), like now, and ready to open the doors.  come by if you can, saturday or sunday, 10 to 5.  lots to see, like the big slab of mahogany above.  click the photos to enlarge them.
 
 wood shop at about 4:00 ... everybody gone but will and kit .  a reclaimed chestnut king size bed, and a 12' white oak table ready to be finished next week...
 i've had pottery out in the past, but this time, for the first time, there will  be prices on the back.
 sam's metal shop is clean and the new lathe is ready to be wired up
 as usual, the banjo shop area is neat as a pin.
 and kit is setting up jer jewelry in the finish room .  the mahogany slab is in there as well as the claro walnut slab for sale on the wall, and there's an oak slab too that would make a small dining table 
or a nice coffee table.
 still waiting for the house to be finished to ship the pool table to long island
 the table from last year's statehojuse show is still looking for a home.
it's a little 'outside the box', but the right person may come by this weekend.
 ready to finish ... headed to marblehead
 our new temporary gallery over the metal shop is set up, and trevor has a few things for sale there too.
and the wild azaleas are blooming ...

Tuesday, May 19, 2015

open studio this weekend

comin up again ... it's vermont open studio weekend.  over 200 artists statewide will open their studios this saturday and sunday from 10 to 5 both days.
stop in here to see furniture, handmade jewelry, pottery, architectural metalwork, 
and custom banjos and guitara.
we're in dorset, one mile up danby mountain road from route 30.  follow the signs at goodwood lane.
there's a map to our studio here
and a statewide open studio map here


there is an album of photos from previous open studio weekends on our 
give us a like while you're there, and come on by this weekend.
more photos as we get set up ..
we'll have lots of stuff for sale at special open studio weekend prices ..
you can see some of the available pieces here

Sunday, May 17, 2015

a pair of antique doors

another interesting and challenging project here involving some antique doors.  the clients purchased them in austin, texas for the home they were/are building in londonderry,vermont.  we've done a number of other projects there, and we're currently working on a reclaimed chestnut king size bed for them that should be completed and ready for finishing this week.
by the time i got involved with the doors, the hole for them was already framed up, and was both narrower 
and taller (standard r.o.height, 82.5") than the doors, which were about 73" x 39" wide as a pair.
we brought them into the shop and did some conceptualizing.  first off, the large strap hinges were trapped between the two layers that made up the doors rather than applied to the face of the door, which is their typical location.
typically, with big strap hinges like these, you block the door in place, apply the hinges, remove the blocking and you're good to go.  having the hinges behind the frame and panel parts of the doors, changed the location of the hinges's pivot point, which meant we had to create a space for the frame and panel part of the door to open into.
and then there was the hinge pintles themselves, which had to be screwed into the frames before the frame was mounted to the wall, or the wall would be in the way ... 'houston, we have a problem' came to mind several times in the engineering of this project. 


anyway, we figured it out, more or less.  in the end we had to add a 3/8ths shim behind the frame, both to keep the irregular backs of the doors from binding against the wall itself and to cover the space where the doors set away from the frames when they were closed.  still with me?  good!

 
here they are in the 'test hang position
 
and in this photo, you can see the white wall behind where we had to add the shims
then, back at the shop we had to add 8" or so to the bottom of both doors; antique and color the frame; add the steel parts sam fabricated to hold the lock and then take them back over and install them permanently
another fun and challenging one

see trevor adding the extensions on the bottoms of the doors below ... we maybe should have added a couple pieces of steel to the extensions, but we were, as they say, 'a bit over budget', and
it was time to hang em.
check those rough planks ...
really rough planks
 
very, very cool old objects, and i can't even guess their age.  they are real.  and they are old.  i'm thinking maybe the planks were the doors first and the frames and panels were added later as 'decorations' .

Wednesday, May 13, 2015

chance to be a hero

ok ... miracles still do happen ... i managed to get the veneer on this top back to flat.  see the full story below, and click the photos to enlarge them, especially of the 'before' top 2 images below ...
4/22/2015
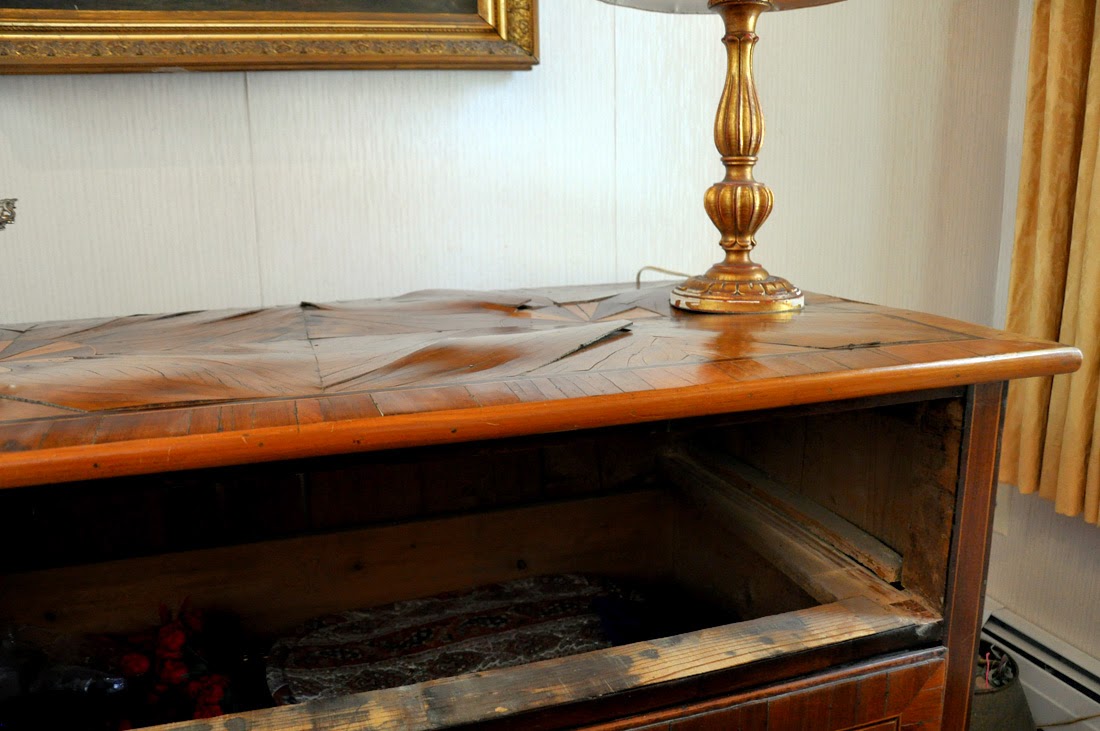
well, the boys in the shop kind of shook their heads when i came in the door with the top from this bureau.  it's austrian, maybe.  the clients bought the bureau in australia in the late 60s. it's a very cool piece with serious veneer isues on the top ..
click the photos to enlarge them ... really .. this is a cool piece.
it's definitely old .. the veneers are hand sawn and about a thin 1/8th" thick.  i can't be sure what the wood is yet, but the bureau exhibits classical construction joinery and an obvious high level of builder skill.  but the top !!! ooo weee!  can we fix that?  we'll see.
step 1 .. start slowly.  pry at the pieces and see what happens .. wow, they sort of pop off easily!  it looks like they were applied with hot hide glue and tapered hand whittled square pegs.  a bunch of them at that.
here are some of the pegs, and they really work ... i'll have to figure out how to make these when i put the top veneers back together.
i decided that at some point i would have to flatten the top and decided to do it sooner rather than later.  once i got the top off the case it got even more humped up, but after a struggle, and some kerfing, it's a lot closer to flat
stay tuned.  i think tomorrow i will make the kerfs a little deeper to remove more of the stress.  the cleats are 3/4" quartered white oak and they couldn't draw the top flat.  it might be easier if i remove more of the veneer. then i'll try to get the glue off the backs of the veneer pieces, which you can now flatten out easily by hand .. the subtop is pine, and the old hide glue pops right off that.  i'm starting to have some hope, even though i've really only just begun. 
4/24 .. a little more progress today .. i think i've got everything off that's coming off and the top has flattened out quite a bit
i might make a few of the kerfs a little deeper monday, and then fill them in with pine wedges, then glue a piece of 1/16th walnut veneer to the bottom to balance the panel .. it should stay flat then ... i hope ... we'll see
update 5/13/2015
ok .. i've been working on this off and on for about 3 weeks, but i finally whipped it yesterday .. i was able to reglue all the original pieces with their original finish back flat onto the original top. i'll be installing it back on the bureau on friday morning.  the owner came by yesterday to see it and she was totally thrilled ... i think i made hero status, for her at least.  below are a series of photos
showing the reinstallation of the pieces
there were some repairs made to this piece in the past with non hide glue so i had to glue some of the loose edges down without removing the entire piece .... no problem, just added more time to the cycle for the glue to dry.  this was just one of many contemplative moments in the process ..
this is typical of the pieces i was able to get off ..
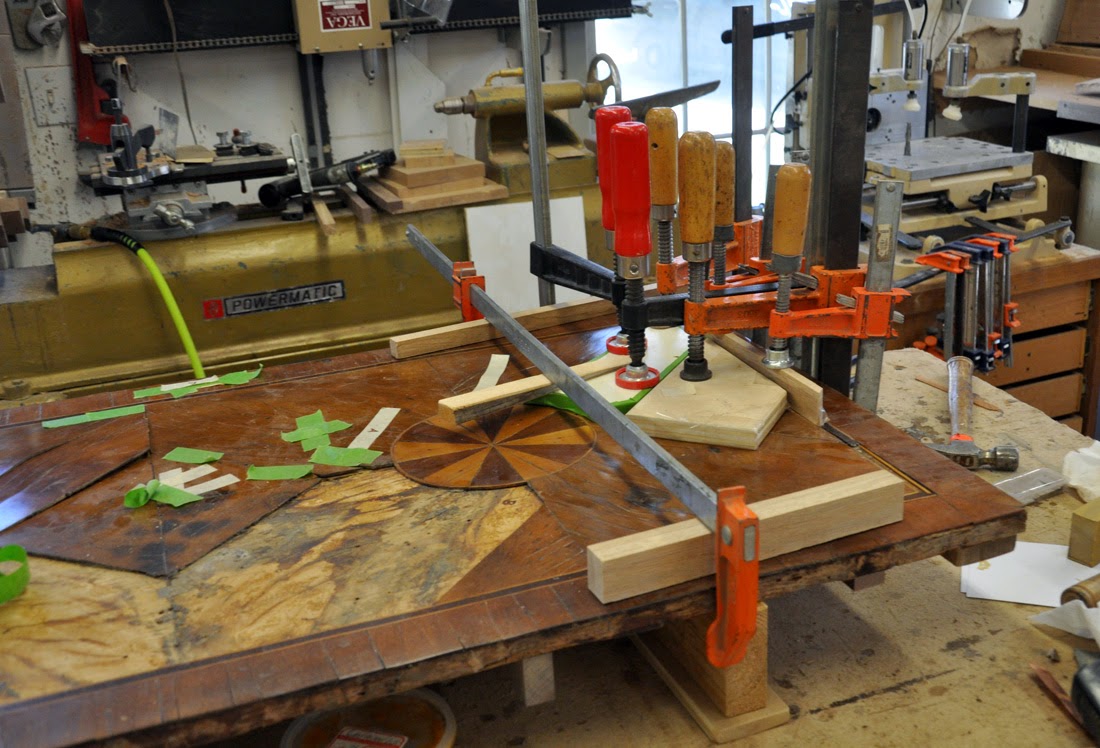
as you can imagine from the previous photo, there were some highs and lows after we scraped the old glue off.  i was able to shim the low spots by trial and error with some 40th inch maple veneers
one piece at a time with some time between each clamping for the glue to set up.  i had to remove the clamps and cauls several times to clean off the hide glue squeeze out as the glue set up.
the melamine clamp cauls worked slick.. the plywood ones we covered with packing tape, which was also effective.  in all glue ups shown here, and in most other antique repairs described on this blog, i used franklin liquid hide glue for future reversability.


as i got to the middle of the top, i had to switch to my original, from the 80s, hydraulic jack clamping concept.  i've got about 10 of them from when before vacuum veneer bags were readily available and affordable.  i even had the sticks, and the blocks were still on the ceiling
so, all in, all done .. i'm gonna take a bow now and go have a guinness ..
5/15/15
can't resist posting a few on site photos


before