Monday, December 28, 2015

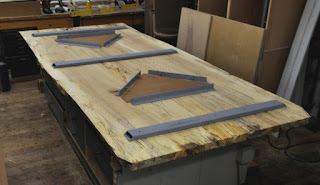
a spalted maple table top

just before christmas, we delivered this spalted maple table top made from a few planks of
this log of spalted maple i had online
based on the client's existing glass top table that came with the house,
he requested a 52" x 115" table top. 
 
the log was 10' long, but there were some 'soft spots' on the
ends of the planks that needed some attention, and in some cases,
some inlays to make them work ..
after a bit of wrestling with skilsaws, straight edges, routers, and jointers,
we got the planks glued up and ready to scrape and sand.
there were two existing pedestals supporting the existing 1" glass top, and they were 
tiled into the floor and for sure not going anywhere
after adding some 1 x 3" steel tubing stiffeners, we took the cardboard patterns that 
the client made for us, along with his measurements, and routed the bottom of the top 
until there was an inch of wood remaining, same as the glass.
we then added some 1.5" angle iron with tapped holes and 5/16ths bolts
to clamp the top to the tiled bases.
  trevor added the contrasting claro walnut 'patches', along with a couple cans of 
minwax wood hardener, a product i would highly recommend if you've 
got some punky spots in your wood.  it's some kind of epoxy that firms everything 
up nicely and does not show discoloration under a clear finish ...
       
the finished inlays
and we squared off the corner where the log was notched for felling
good to go ...
and we also made three 'trays' from another plank from the log.
and those will be flanked on both sides by custom cushions at a later date ...
we still have a few long planks and about 8 short coffee table planks available for other projects.
great looking wood ....

Thursday, December 24, 2015

merry christmas !

merry christmas, happy holidays, and best wishes for the new year to you and all your families.
we had a rainbow briefly over the metal shop on tuesday afternoon .. we all took it as a good omen for 2016 ...
and a fine sunset to go with it  ....


Thursday, December 17, 2015

worst case scenario


i just received notice that an installation originally scheduled for november 
and then january, has been postponed to mid february .... 
just after, i passed this new yorker cartoon that is on my office bulletin board
and had a little chuckle.

Monday, December 14, 2015

a base for a glass topped table

interesting request here .. the client needed 'just the base' of a table like the one below
to support a new glass top for a custom banquette in their home .
click the photos to enlarge them ...
we've done several versions of this design
and i just had to adapt the dimension to their floor plan shown below

we made a quick model with a plexiglass top
got the approval and i passed it on to trevor, who has become our specialist in
creating these unusual table bases.
he has worked out the engineering for the jigs and joinery cutting ...
looks scary maybe to some, but it's actually very safe the way he has set it up

and he has figured out the gluing up .. glue two halves together, one at a time,
 then glue the two pairs together
don't forget to add the dowels that are engaged by the lag bolts that hold the base
very securely to the arcing supports ...
check it for level .. pretty good
and send it off to florida on the southbound ... 
all good!

Thursday, December 10, 2015

a round expanding dining table with a leaf


the 'black' walnut tables roll on ... i think this is our 4th or 5th in the last
couple years.  this one is a variation on our' midcentury modern' style, only with a more open,
stationary pedestal, rather than a two part moving one in the photo below.
 
we made this design in july of 2014
of the same genre, there is also this design, from march of 2014
as usual, we started with some nice matched walnut from our friends at irion lumber.
both the earlier and the current cad drawings here


the equalizing runners we used on this table were from osburne manufacturing
base with the sub top, on which the runners are mounted.  
patchwork veneered top frame for the python chest on the sub top there.
trevor cut the halves, the base pieces and the aprons on the cnc, but
all those processes could be just as easily done by hand .. it might take much longer,
but the operations are standard for most woodshops.
here's trevor checking the runner mounting.  this hardware actually worked very smoothly.
ready for finish above, with one 20" leaf.  add the adam brown mahogany water stain and
a three coats of lenmar poly, and it left for virginia on tuesday.

fun project with a new designer client from the d.c. area ...
this just in ....

Saturday, December 5, 2015

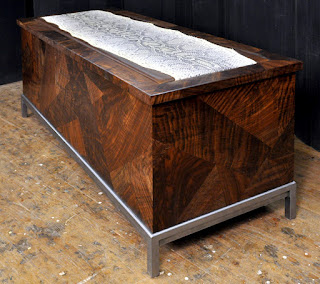
a patchwork chest

well, chris and i finished up an interesting claro walnut patchwork chest this week.
we had a little help on the snakeskin and leather from isaiah mccaulliffe and his crew
at bespoke custom upholstery in manchester, vt .. the python was from edelman leather and the 
brown bomber jacket complement was from universal leather.

inside was northeast aromatic cedar paneling, planed thin to balance the veneered panels

we started with the cad drawing and a steel base by sam

and then we made a pile of shop sawn veneers from the various slab cutoffs we keep on hand
and worked our way through the process.  first step is to cut the veneers to shape and
temporarily tape them together with masking tape while we fit the pieces to each other.
          

 then the masking tape is replaced with veneer tape which is more easily removed
from the panel faces after they come out of the veneer bag.
once you've got the four panels cut to width and mitered, the next step is to glue up
the box.  in this case, we glued mitered clamping cauls to the faces of the panels with
brown paper bag strips to hold them to the panels while we (gently) clamped them together.
as i recall, we glued first the two opposite corners, let them sit, then finished up with the 
other two corners once the first pair were set.
we used the base as the reference for square and kept the pieces vertical with the L shaped 
supports to keep the panels plumb and square ... we also clamped in a temporary 
bottom of melamine to keep the case square.
once the corners were glued up, we knocked off the temporary cauls and
sanded off the paper bag remnants ... this trick works slick for tall miters.
glowing in the sun in the finish room

delivery to the client next week ... should be fun ...