Pages
▼
Saturday, February 23, 2008
The Williams Store Railings
Double click the pictures for better viewing
Well, the HN Williams Store expansion project is now open to the public! Sam has spent quite a bit of time on these railings, starting last fall. The items welded into the tops of each section came from the attic of the store. Williams Store has been in the same family since about 1840 and some of the stuff they found when cleaning the attic is definitely from the early days. Read on their website about the time when the horse bits and the shoe forms in the one section of the railing were part of the main business of the store. They recently redid the foundation of the whole store and created a new lower level for hardware, garden and yard tools, and clothing sales .... and, hence the railings ... Contact Sam at 802 867 0139 for custom metal railings, forged, welded or fabricated metal objects, fireplace tools, metal repairs, or to order a piece of wood and metal furniture from the 'wood and metal' section of our website. In the post below about the Walnut Slab Table you can also see Sam's handiwork on the metal parts of the base.
Manure spreader gears, elevator chain and tractor bucket teeth...
A maple syrup draw off valve....
One of the five horse bits, more manure spreader gears
and some cutter bar teeth...
Friday, February 22, 2008
A Round Expanding Table
4/7/08 ... We finished this one up a few weeks ago but it's not leaving for a minute and I just got around to taking the pictures and adjusting the photo images. Great project. As usual, more complicated and more pieces than I thought, but a still a great project, nonetheless ..... Click to view ... Story below ...
The finished table in the closed position
With the four 18" leaves
Underview showing the concealed leg and the runners ...
The finished table in the closed position
With the four 18" leaves
Underview showing the concealed leg and the runners ...
2/22/08 We started the design work for this project back around Thanksgiving and we're now well on the way to wrappng it up. It will sit in the formal parlor of a fine, vintage 1840's, Philadelphia townhouse. The photos are posted from conceptual work through the present in reverse order with the most recent at the top. Double click the photos for better viewing. The table is built using figured mahogany and will have black painted details and ebony and burl inlays. It will be a 39" round in the closed position and will open to 112" to seat 10-12 comfortably.
3/15/08
We were about to apply the final coats of finish to the table top when I realized I HAD FORGOTTEN THE ABALONE TRIANGLE INLAYS !! It was kind of nerve wracking inlaying them into the nearly finished top, but they came out fine and are definitely a nice, eye catching addition to the overall design ...
INlaying the triangles process....
Outline
Rough rout with 1/16th" bit
2/27/08 We're now working on the burl center inlay for the main table and for the leaves. The small half circles we can glue to the table with clamps , but the leaves will go in a vacuum bag press so the the larger area (11 x 18) can be clamped with more consistent pressure.
Fitting up the pie shaped pieces of the center inlay.
Clamping the fitted inlay to the table.
Fitting up the inlay for the leaves 2/27
The table as it is today 2/22 with a photoshopped on apron and painted molding detail
My son Will, rough bending the inlay pieces for the circlular ebony inlays with a shop made 'hot pipe'. He could, with just the hot pipe and careful control of the heat, bend the kiln dried ebony, or most any other thin wood, into a radius slightly larger than the pipe itself. We learned this technique from the guitar makers catalog, how to books, and a little experimenting. The .35" burl line is cut, not bent.
A close up of the inlay process. This is actually the third step, as each layer is glued in, one piece at a time, using the nails to temporarily force the pieces into place until the glue dries. The blocks for the edge inlay are in the backgroound.
End view of the whole table with the triple outer inlay border (ebony/burl/ebony) set.
3/15/08
We were about to apply the final coats of finish to the table top when I realized I HAD FORGOTTEN THE ABALONE TRIANGLE INLAYS !! It was kind of nerve wracking inlaying them into the nearly finished top, but they came out fine and are definitely a nice, eye catching addition to the overall design ...
INlaying the triangles process....
Outline
Rough rout with 1/16th" bit
photos above show the marking, routing and hand fitting inlay process
3/9/08 ... Close up of the top with the completed edge inlay, ready for final stain on the mahogany.
In this picture, the pieces have been firstcoated with stain and the inlays have been masked off in preparation for the final color on the mahogany. You can see the finish sample of the final color in the foreground and the black apron details nested within the leaves. the other black column details and moldings are in thefar background. All of a sudden it dawns on me that there are A LOT of pieces in this table.
Inlaying the edge detail.
Showing the length of each piece of edge inlay.
2/27/08 We're now working on the burl center inlay for the main table and for the leaves. The small half circles we can glue to the table with clamps , but the leaves will go in a vacuum bag press so the the larger area (11 x 18) can be clamped with more consistent pressure.
Fitting up the pie shaped pieces of the center inlay.
Clamping the fitted inlay to the table.
Fitting up the inlay for the leaves 2/27
The table as it is today 2/22 with a photoshopped on apron and painted molding detail
My son Will, rough bending the inlay pieces for the circlular ebony inlays with a shop made 'hot pipe'. He could, with just the hot pipe and careful control of the heat, bend the kiln dried ebony, or most any other thin wood, into a radius slightly larger than the pipe itself. We learned this technique from the guitar makers catalog, how to books, and a little experimenting. The .35" burl line is cut, not bent.
A close up of the inlay process. This is actually the third step, as each layer is glued in, one piece at a time, using the nails to temporarily force the pieces into place until the glue dries. The blocks for the edge inlay are in the backgroound.
End view of the whole table with the triple outer inlay border (ebony/burl/ebony) set.
Saturday, February 9, 2008
Walnut Slab Dining Table
After the table arrived, we got the letter above ... "trumped the house" is a bit of an overstatment, but I think he did like his table ... Click the letter to enlarge it ...
3/3/08
The shippers will be picking up the big walnut slab dining table we have been working on for about a month now on Wednesday morning, and they will be taking it off to it's new home on the Snake river in Idaho, overlooking the Grand Tetons. I'm sorry to see it go. It is truly a one of a kind dining table. So, when it gets there, it will have started as a grafted tree in a walnut orchard in California, where it grew for a hundred years or so, than traveled across the country on a tractor trailer, as a log, to Pennsylvania, where it was sawed into planks, than air and kiln dried for three years before being shipped to Vermont to be made into the table you see below. I figure that's about 6000 miles and over a hundred years ... hope it makes it for at least another hundred ........ Double click the photos for better viewing.
A photographic challenge ... the table is 4' x 10', my finish room/ photo studio is 15' x 22'.
See below for structural details
Close up of the far end
Closer up of the far end
Here's the whole story .... from 2/9/08
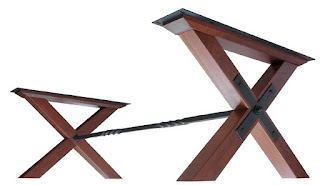
We are currently working on a 48" x 10' walnut table made from a single 2 and a 1/2" thick slab of Claro walnut from California via Good Hope hardwoods in Pennsylvania. the design is based on a recycled chestnut table we made previously for another client. The table will have a classic "X" stretcher with a 1.25" solid twisted steel bar connector to reinforce and stiffen the base. The steel will be fabricated in our custom metal shop by my son Sam. The table top will be smoothed and polished using hand tools as it's too wide (49") and too heavy for any sander or planer that I know of locally. In the lower photos, we are in the early stages of the smoothing process and base construction, but hope to ship the table before the end of the month. The photos are posted in reverse order, with the most recent (today) at the top and going back in time to the start of the project. The table now has its base coats and will receive 3 or more polish coats next week before shipping it to Idaho.
In the finish room today ... a little cluttered, but too big for the background paper. Close, but not completely finished.
This photo actually was flipped from the upside down position (see below) and cut out in photoshop to show an uncluttered view of the structure which provides the rigidity to the heavy table top. The one and one quarter inch solid steel is welded to short threaded rods which then pass through and are bolted to the x shaped 'washers' which have previously been bolted to the xs. It's this steel structure that allows the +/- 300 pound top to sit with absolute rigidity on it's somewhat minimal base. It's like bumping into a pool table.
Claro walnut
close up of the slab before starting the finishing ...
In this photo, the assembled base with the twisted steel stretcher is upside down on the shop floor with the slab of the table in the background.
close up of the slab before starting the finishing ...
In this photo, the assembled base with the twisted steel stretcher is upside down on the shop floor with the slab of the table in the background.
Sam, forging the twisted connector. Actually, it took two shots to get it right. The first time, Sam and his brother, after some discussion, accidentally made the two twists parallel, rather than opposed. Soooooo, they had to reheat the bar and straighten it, reheat it again and twist it in the right direction. Of course they didn't tell me this until after I had told them it looked great. And, really, you'd never know. It's pretty amazing to me that a chunk of inch and a quarter steel can become so flexible with just a little heating.... well, ok, a lot of heating.