Pages
▼
Sunday, March 29, 2009
Sunset/Sunrise ... A New Sculpture
Sunday, March 29th .... Yesterday was about the best possible of the early spring days, 65 degrees and sunny, where you want to be outside just every second, followed by today when it was mostly cloudy with occasional cloudbursts and showers, high in the 40's. I've been reading this sort of tedious, sort of interesting book, called 'The Black Swan' by Nassim Nicholas Taleb. It's about the power of unforeseen and unpredictable events (prescient I guess this guy is since it was published in 2007). Two of its more interesting (to me) premises are #1. the thought that the daily news just reinforces our views and can close our minds to new ideas, an interesting idea to someone who has spent a not small part of his life reading The New York Times, and #2.,that prediciting the future is a nearly useless, wasted effort.. That hit close to home on my woodworking estimates. I can make a plan with my morning coffee and it can go out the window 10 minutes after I get to the shop. Happens time and time again. The Black Swan guy uses as an example the Sydney Opera House that was supposed to open in 1963 at a cost of 7 million Australian $. It actually opened around 1973 at a cost of 104 million Australian $. Even I'm not that bad. So today, in honor of premise #1, for the first time I can remember, I made a point of not buying the Sunday Times and of not sitting on the couch and reading it. I decided instead to make a new sculpture. It's been rattling around the metalshop in parts and pieces for a month or so and today was just its day I guess. We get our fair share of good old red sunsets here, at least when the leaves are off the trees and after about 12 years or so of them, they bore into your brain and show up in your sketch book when you least expect them, like here, back in November. Anyway, there's not much to my sculpture ... some 1.25" solid steel square stock that will eventually turn a nice rusty orange out in the rain, some kind of base and a red/orange (or maybe gold leaf) sun/moon motif. The one in the picture's spray painted plywood. I mocked up the base today using some pressure treated 2 x 12's, cut on the cnc, and later, I'll probably use some locust planks I have stickered and drying. I cut two different hole patterns but didn't have enough steel verticals to mock up the alternative, dual sided concept. Maybe next Sunday I'll finish it if I can truly kick the newspaper habit ... We'll see ... Click the pictures to enlarge them ...
From my sketchbook ... 11/7/08
The temporarily 'finished' piece ... Just before dark Sunday evening ... high ISO digital photography is your friend .. available light, ISO 1000
Showing the alternate double sided pattern
Cutting the square holes on the CNC
Lining up the assembly with a short steel and a framing square ...
Update on The Lutyens Desk
Well, we wrapped it up on Friday. The client came to town and approved our pull design in natural cherry rather than the burl we proposed originally. It was the perfect choice as the burl pull looked 'mushy' against the burl veneer of the drawer faces. The polished cherry stands out without drawing too much attention, the perfect thing that hardware should do. This was a very interesting adaptation of a famous designer's design; we kept the original classic concept yet the client was able to add her vision to the process and in my opinion improve on the original shown at the bottom of the original post.
The finished desk
Close up of the corner showing the bubinga/walnut edge detail and drawer borders, as well as the fine leg turnings, pulls and finish by Will.
Since this desk will be used in a home office, the center drawer is given over to a keyboard flip down and mouse nest.
3/8/09 After being distracted for a bit by the Big Walnut Slabs and the new doors in the posts below, we got back on track on the desk this week. Will finished the small drawers Friday but we still have to work out the flip down front for the center keyboard drawer and build the shelf for the computer cpu to sit on. Also, as yet, the base is not glued up, awaiting final approval of the details, which we received today. The edge inlay on the top is complete and the top is ready for final sanding and finishing. It's looking like it's going to be another good one .... Click the photos to enlarge them ...
Installing the bubinga and walnut edge inlay with masking tape, our favorite handy clamp. First we put the bubinga on flush and then routed an 1/8 x 1/8" rabbet for the walnut. The walnut is long grain over the length of the top and cut across the width of the board on the ends to allow it to expand and contract with the top. Check the original post for more detail and background.
The finished edge inlay
Thursday, March 26, 2009
Some Doors Like I Haven't Made Before (Update)
3/25/09 Home stretch now. Today we went back to the site and hung the completed empty frames, did the final adjustments to the primed doors, mounted the catches and returned the doors to the shop for final painting and glazing ... nothing left to do but cut 52 pieces of irregular glass with thin muntins, (no room for sloppy glass cutting), putty em, final coat the insides of the doors and hang em up ...next week this time ... Phew! .. Click the photos to enlarge them,,
3/20/09 Had a brainstorm Wednesday. I took all the glued up door frames to the site and fitted them to the existing cases before I did any more work on them. Since the cabinets were site built, and not by us, there was some 'reconciliation' that needed to be done so that the doors agreed with their surroundings. That bit of prep work also took away the anxiety that I would have had about doing a lot of work on four doors, wondering as I finished up the glass work, if they were going to be the right size. After this week, I think I might go back one more time and install them with the paint, hinges and catches on before I do all the glass work. That would lead to a truly peaceful final installation ....
This post actually started on 3/6, about half way down this entry, but we just got back to working on the doors this week, and, after making a few jigs and holders, we think we have everything figured out. We actually glued up the first whole door and took it off the jig at the end of the day today .... AND, the grid was, as I mentioned in the first part of the post, surprisingly rigid. As they say, the rest is just an exercise. A little fitting, some priming and painting, and a little antique glass cutting and glazing .... installation, catches, pulls, final painting ... We'll be done by Christmas for sure .... The whole process would take a Fine Woodworking type article, but I'll just hit the highlights here. Click the photos to enlarge them ...
To start, we placed the glued up door frame over the glass divider grid ... see detail below that shows the start of the divider grid process ... you have to notch the grid where it interesects the frame so the the moldings can sit over the glass dividers ... trust me on that one ...
Now, using the cheat sheet in the middle of the jig that shows the angles of the mitered intersections from the CAD drawing, cut the molded and grooved top pieces to fit using a thin blad on the table saw, and glue them to the divider grid as they are fitted up. I started with the corner rectangles, than did the center rectangles next, and then the four way x's last.
Viola ... door one glued up above.
The skinny muntin bars were molded on the edges of a wider (4" strip) and then ripped off and the edges of what was left molded and ripped again...
Then we had to make a holder jig to run the skinny pieces through the shaper with the power feed.
Once they were molded, we ripped the skinny part off and milled the center groove (not shown) that locates the molding on the glass divider grid. (are you following this? ) Below is the original beginning of the post with the CAD drawing, the matched cutters and the info on making the glass divider grid ...
3/7 The cutters are here
We had a request to make some doors for some existing bookshelves in a client's house. We started with the typical 'picture in a book' of some Federal, I guess they are, style doors. I had restored some similar, but slightly different, doors a couple of years ago so we had the basics under control. To start, on the CNC Trevor made the pattern of 1/8" deep channels in a piece of MDF using the CAD drawing below ..
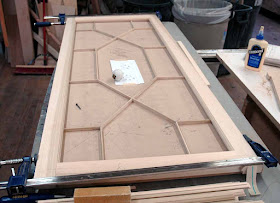
The 'web' after the Elmer's glue sets on the muslin ... You can see the 1/8th " deep channels Trevor cut on the cnc to help him keep the frame parts consistent and symetrical. Easier than working on top of a drawing.
Close up of the muslin reinforced joinery of the 'web', which is the first step. Glued butt joints reinforced with thin muslin glued on with Elmer's white glue. Next we'll make the little molded 'hats' that will form the muntins to hold the glass. (See the cutter CAD drawing below) Those will also be butted and glued to each other and to the 'web', coped into the door frames and once glazed, will be more rigid than you might suspect. Check the cutter cad below to get a better picture of the final concept ... Click to enlarge the photos ..
door CAD
Cutter CAD showing the molding 'hats' just to the left of the cutters ...
More to follow ..
Friday, March 20, 2009
Tansu Stairs Update
3/20/09 Trevor made some progress this week on the tansu stair cabinet described in the post on 3/9. It's pretty much his baby, with the rest of us brainstorming with him as needed. He's doing a great and careful job on a complex project. The main cabinet is complete now with the face frames and cabinet backs glued on. Yesterday and today he's been working on the templates for the three steel railing sections that Sam is making parts for. He cut some cardboard railing outlines and mdf post prototypes on the cnc to discover minor corrections that need to be made before cutting the real templates and posts on Monday. He also took a little time out this afternoon to do the butterfly inlays on the walnut plank in the foreground of the end of day shot above .... (click to enlarge it) ... On the face frame. rather than do the half laps the old fashioned way with a manual layout and tablesaw dados, he convinced me he could cut them as fast using a combination of the cnc for marking and layout and the tablesaw for halflapping. I think it took him a little longer than usual as it was his first time, but I want to tell you ... that face frame is perfectly square with not one drawer front off 90 degrees. I'm coming around to his way of thinking ....
Checking the rail to wall and mocked up ceiling fit
Checking the post notch and rail taper angles
Some of the drawer parts with some of the risers and treads stickered in thebackground ... Lots o pieces.
Small two man brainstorm session
Fixed It
Like an old house, you never where you're going to end up once you 'open the door'. We started out fixing the obvious broken leg in the second photo below, and before we knew it, we had both the back legs and the back splat off, which turned out to be a good thing. We were able to clean and reglue the joinery and the glue blocks and now I feel as if I can actually let the client sit in the chair when he gets it back. Construction was typical of the era, mortise and tenons on the seat rails and legs, a joint that solves the connection problem but also, over time typically develops weakness where the leg is mortised all the way through. It's not like new, but then again, I'm not either and I'm still going ....
We all just loved the face in the top rail
The obvious broken leg
The other back leg
The band clamp pulled it all together ... we'll put the screws back into the glue blocks tomorrow after the hide glue sets up ....
We all just loved the face in the top rail
The obvious broken leg
The other back leg
The band clamp pulled it all together ... we'll put the screws back into the glue blocks tomorrow after the hide glue sets up ....
Thursday, March 19, 2009
The Parrot Chairs ... Sketching in Metal
Inspiration Photo
Via a referral from a friend in Massachusetts, we were contacted by a client who had an interest in having Sam fabricate some 'parrot chairs'. The client had saved a picture from a magazine, but had no other details like measurements, what the front legs looked like, a close up of the parrott detail, etc. We agreed to make a mockup for a small fee and the results and their proposed changes are shown below. It took us a while to get to it as there were some 'thought problems' to work through such as how to bend the back legs/hoop piece with even a small amount of repeatable control. I'm sure these things are pressed out cold by the thousands in factories around the world, but unfortunately, we're not one of them. We ended up making a pretty elaborate jig that, with a few modifications, will work fine. The jig was essentially based on the one we use to steam bend backs for Windsor chairs, something we've been doing since the late 70's. Creating a new chair design is tough in any medium, as what you are really creating is a functional sculpture, something viewed from all four sides with small complications like comfort, durability, and repeatable production thrown in. Tough in wood, not much easier in metal ... We'll see if we get to build them .... It will be a challenge for sure if we do ....
Wednesday, March 18, 2009
A Client Rained On My Parade
I was feeling pretty good at the end of the day yesterday. I had the first of my four Federal style doors glued up and it looked good ... ready to paint and 'surprisingly rigid'. A very cool and challengingly complex, (IMHO), item. As I was leaving, a local client stopped by with a chair and a bed rail for us to repair. The bed rail was a bed rail but the CHAIR !!! ... well, it's just an amazing and humbling piece of work. Looks like it might be from the 1850's neo classical revival/Biedermeier era ... I'm not sure, but regardless, it's a knockout. It has a nice warm, shiny, French Polish finish so it was impossible to photograph with all the reflections and I was in a hurry to get outside to the fine spring afternoon, but here it is ... The back leg is broken for what looks like the second or third time, but we can splice it back together so it can go back with another one just like it ... Hard to believe the guy lived long enough to finish one, let alone two of them ... Click the photos to enlarge them ...
close up of the splat inlay
Friday, March 13, 2009
Ice Out and Other Updates
Mr. and Mrs. Mallard Return from the South
This year spring is arriving in a new (to me) progression. We had robins back in the beginning of February. Saw my first pussy willow last Sunday in the swamp downtown and yesterday, the ducks showed up in our pond before the ice was even totally out. We usually have a 'first ducks of the year" dollar pool in the shop but we generally don't even think of putting up ouor choices until the second half of the month. For the last 10 years , the winner has been around the first of the month. Anyway, the light is great, the time change is great and while it's still COLD ! ... spring is on it's way. Kit saw a redwing blackbird this week and also had an unusual siting of a flock of whitesided cross bills, a Canadian bird not normally seen this far South.
Busy here this week ... too busy to write much ... Below is a quick update on our current projects and I'll write more later this weekend (maybe) ... It's pretty nice and spring like here ... Good to be outside ...Click the photos to enlarge them ...
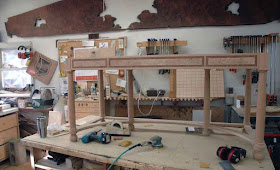
Progress on the Federal Style Doors is good. All the production kinks have been worked out and they should all come together pretty quickly next week. Fussy but incredibly challenging work. I'm actually doing them myself as I couldn't elegantly sum up the process for anyone else to understand and they were all busy on other stuff anyway. I'm enjoying the mental and physical work of being back in the shop for a change. I think Will will help me finish them next week as, except for the the turned wood knobs, he's finished the construction of the Lutyens Style desk.
The face of the center drawer flips down for a keyboard... the curving base parts came out great..