Pages
▼
Sunday, January 31, 2010
Alleviating Social Media Fears
Bill LaBerge and I attended the quarterly meeting of the Vermont Wood Manufacturers Association Friday.. It started at The Brandon Inn with the business meeting in the morning. From there we adjourned to the former Brandon training center for a tour of the design center and new woodshop of The McKernon Group, longtime luxury home builders in the area ... It was a very impressive facility and the people we met there were very friendly and informative ... They fed us a nice lunch and set us up for the real reason I went to the meeting.
The afternoon session featured a presentation by Rachel Carter, who owns a public relations firm in Charlotte, Vermont. Rachel's mission is to provide Vermont businesses with "individualized public relations programs encompassing the power of social media and the ingenuity of grassroots marketing." It was, overall, a fascinating and well done presentation. She started with the basics, LinkedIn and Facebook, and went on to cover things like blogging, search engines, free online listing and analysis sites and Twitter, the micro blogging site. I've resisted some of this stuff so far, but after listening to Rachel, I think I will sloooowly integrate as much of it as I can into my
online marketing program and see how it goes ... All it seems to take is time and some interest in the process. I already have a blog. I'm already personally on Facebook and I've had some fun with both of those ... LinkedIn ... I can do that ... Twitter??? The thought makes me kind of cringe a little, but I'll check it out and see what's up with that. Who knows. I think Bill Gates is Twittering now. My first computer had a 40 MB hard drive and cost $3500. We've come a long way from there ... Onward ...
Thursday, January 28, 2010
Finished the Jewelry Cabinet
Will completed the Jewelry Cabinet today ... Finishing takes time, and it's always best not to rush it ... He has been building the layers of aniline dye, gel stain,varnish and polish for the last week or so while he helped with the construction of the mahogany table .. He's also been adding the mirror, stool upholstery, velvet drawer bottoms and compartment dividers ... All done now ... It will be off to its new home on the Vineyard before long ... This was a interesting collaboration with the clients and an inspiring new design ... Click the pictures to enlarge them ...
Before the color ..
All done ...
With themirror and drawer dividers ... The trays slide easily completely in and out of the case ...
It is really hard to photograph a mirror
Shows what you can do with a little judicious photoshop cutting ... All the photos above were cut from their busy backgrounds as we have too much stuff in the finish room to set up the background paper ... Takes a minute but it is well worth the time ...
The finish sample and fabic choices we sent the client ...
Curly Maple Finish Schedule
The finish schedule for the curly maple jewelry cabinet is below .... I make no claims of repeatability here. Everyone will get different results from this recipe; slightly different results each time. It lends a certain anxiety to the process but it is something, I think, that makes our furniture stand out a bit from the crowd, ... ... We mix the basic colors as Lockwood advises, one ounce by weight to one quart of warm water, which represent the full strength stains mentioned below. Over time, the colors can increase in strength through evaporation. It is totally required that you make a complete, good size finish sample all the way through inlcuding varnishes and gel stains with all stain/water ratios carefully noted before moving on to staining and finishing a whole piece of furniture.
1st coat lockwood light golden brown walnut (4 to 5 parts water to 1 part stain), brushed on, sponged off to raise the grain.
That is sanded pretty good when dry with 150 or 180 3m 216U or equivalent. At this point you can still fix defects that come to light as you sand. Recoat and resand lightly if necessary.
A 2nd coat of dye is then applied ( 1 part standard brown walnut + 1 part american walnut to 8 parts water.
Do not sand that coat of stain, but when dry, apply the first coat of gloss varnish (Minwax fast
dry poly) Brush on a nice wet coat with a foam brush and leave it in a dust free place if you have one.
We sand that lightly with 400 wet or dry and then in this case, we applied another coat of the dilute light golden brown walnut over everything because it didn't look 'quite right' to us at that point, compared to the original sample. That doesn't move the color much, but it is noticeable ...
Brush it on, sponge it off. At this point you should be getting a good idea of the finished color.
Then we use a minwax aged oak gel stain and after at least a 24 hr dry time, apply a second coat of minwax fast dry poly SATIN, again with a foam brush.
That is sanded very lightly with 1000 grit wet and dry 3M, and topcoated with a mix of poly and linseed oil, wiped on, wiped off, completely dry ... 3 poly, one oil or thereabouts ...
After that, the cabinet was reassembled and the hardware was installed...
Not fast, totally subjective, but in my opinion, it's where the Art lives.
Before starting, also please read this blog entry ...
target="_blank"http://dorsetcustomfurniture.blogspot.com/2009/12/mysteries-and-art-of-finishing.html
Here is another stain link with other info ...
Sunday, January 24, 2010
Dan Goes To the Museum
I was in Boston visiting my ailing sister a couple of weekends ago, had an hour or so to kill, and wandered into the the Boston Museum of Fine Arts for the Egyptian show of items from Tomb 10 A, a fantastic collection of Egptianana if ever I've seen one ... The younger son Will often brought home 'The Treasure of King Tut' from the elementary school library so my interest in that subject goes waaaay back ... I had not been to the BMFA since we took the kids oh maybe 15 years ago and I was due for a refresher .. Museums are amazing places ... full of ideas and information, things you don't see anywhere else. They can really recharge your creative spirit .... This was a good visit. Click the pictures to enlarge them ...
Just like my front steps
I started with the music room across from the coat check ... loved the abalone and ebony triangles ...
They had a couple of really fine banjos, and this was a particularly spectacular peg head
Next stop an exhibit on art and music .. There were some pretty good things to see here. Click them and you can read the signs yourself ...
All the pages of Beethoven's Seventh, sort of transparent and on top of each other on the left, a Wagner opera, same deal, on the right ... about 30" x 60" each .....great concept ...
A John Cage graphic
A couple of great early Dylan photos
A wall of portraits by Herb Ritts .. Little Richard, Bowie, Springsteen,Courtney Love, Tina Turner...great photography ..
But this ... you had to be there for this ... 30 people do synchronized Madonna singing and dancing .. hypnotic .. read the blurb below and imagine you're one of them ...
This was a nice exercise in color and music ...
All in all ... it makes you think .... Tomb 10 A coming up next ...
Saturday, January 23, 2010
Tomb 10 A .. The Show
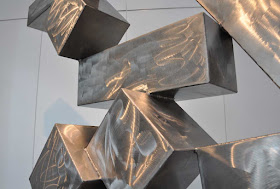
On my way to the Egyptian show I passed by this David Smith sculpture, one of his 'Cubis' series. Sam and I had seen his exhibition at the Guggenheim a couple of years ago and he has been an inspiration since ... Click the photos to enlarge them ,,,
Great sculptor, good welder too ...
Nice banner for the show
Into the show itself ... An almost life size carving at the entrance to a display of his and his wife's burial vaults ...
The door is so the dead can see the sun rise ... I highly recommend the audio tour
Box in a box in a box
All interior surfaces were covered with carefully painted symbolic details ...
Along with some hammered gold and lapis lazuli jewelry ...
Then there are THE BOATS ... They were found in a jumble left by tomb raiders and carefully restored and reassembled after considerable research and study by a team of obviously very patient people.
And there were a lot of boats
Each with incredible detail
A little more jewelry ... more stones and hammered gold
And then I was off to the Oriental furnishings and artifacts .. I have more photos. stay tuned ..
Big Board Table
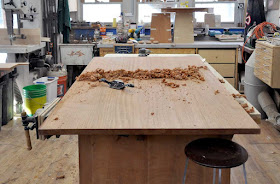
I've been shuffling this piece of wood around to various locations in my shop, garage and finish room for about 3 years now. Enough of that ... I decided it was time for it to be something besides just a cutoff too big to throw away .... The question always was 'exactly what should it be'? It's a bit of an odd size, 40 x 68", and for now it's going to be a coffee table with a steel base like one Sam made recently. I had plans to do some fancy stuff on the top (recessed squares like on the bar doors, maybe some metal or abalone inlays), but in the end, it's a big board and I decided to just let it be that for now. Sam and I are working on a series of collaborative designs with metal and wood and this will be another in the series ... Click the pictures to enlarge them.
The base ... I think we'll blacken and oil it next week when the top is done
Scraping the top ... If you don't have one of these two handled scrapers, get one... Trevor had milled the board flat on the cnc but there were still tool marks that had to be removed. The #80 made short work of that ...
Joint it straight and rip it to 39.5" wide ... Cut the ends o nthe panel saw ...
Plane the end grain and polish it ... off to the finish room
Origin of the 'cutoff' ... We had a commission for a 40 x 84" mahogany table about three years ago and when I contacted Irion lumber, I asked if he had any wide mahogany for the top. When I told him how wide the table was, I think Myron said something like, 'Yeah, I have some that wide.' I had to buy the whole board, but hey, not such a bad thing now ....
Wednesday, January 20, 2010
Another One Bites The Dust ... Robert Parker
One of my longtime favorite authors has left the building .... Robert Parker has been my go to guy for a relaxing weekend read since my father-in-law introduced me to him about 20 years ago. There was an article in the Boston Globe today detailing his career ... 65 books in 37 years, and, though I haven't read them all, I haven't found a bad one yet ... Snappy dialog, great characters, mostly happy endings, varied subjects and plot lines, easy, relaxing reading ... It's not War and Peace, but that's not what you're looking for on the weekends, is it? If you haven't tried him yet, I'm sure your library has about 20 of his books to choose from ... Any of the Spenser detective series, or the Western, 'Appaloosa' would be a great place to start ..... You can't go wrong ... For a short taste of what you might be in for, click the Robert Parker link above and try 'Author Blog'.
New Mahogany Table
We started a new table this week. It's a custom version of the one above (shown on my website here) that we first made in 2004 for a client in New Jersey. The one we're working on this week is slightly larger ( 50 x 72 closed) and will be all mahogany, without the black paint, curly maple apron or edge inlay ... We had a great piece of mahogany on hand, 23" wide by 157" long and we were just able to get the whole top out of that one board. It took a little planning, but because it is all one board the glue joints are virtually invisible ... Click the photos to enlarge them ..
The Cad drawing, adpted from another version from 2005. I think, in total, this is the sixth edition of this table, each one being slightly different ... It's a great design because the pedestal is heavy enough to support the open table and leaves leaves without the pedestal splitting or the use of drop down legs. With the central pedestal, the chairs can be placed anywhere too ...
You can see in this photo how we split the first cut (so it matches as halves when the table is closed), and cut the two 2" arcs we needed to make the additional width before we cut the remainder of the board in half ... pretty clever thinking by the boys in the shop ...
Glued up halves with the arcs added
Trevor, handscraping the individual halves before drilling for the alignment pins ...
The extension runners are installed and the aprons are glued up on the table, but slightly askew from their final locations ...
In this photo,, Will has turned the 'flying saucer' feet, has stacked the ply parts of the base, and is adding the edge veneers .. We don't use solid wood on this part as it has to support a lot of weight and the short grain of the curves at the ends of the 'propellers' might be apt to fail over time ... When it's done, it will look like solid wood ... The hollow central column parts are cut and ready to glue up tomorrow .. All for now ...
Tuesday, January 19, 2010
Hey! I'm A Real Writer !!
Someone, (Woodshop News) , has actually paid me to write something for them. Appropriately enough, it is a short essay about blogging ... Even got a blurb on the cover ... It's online here now ... Check it out ... dan