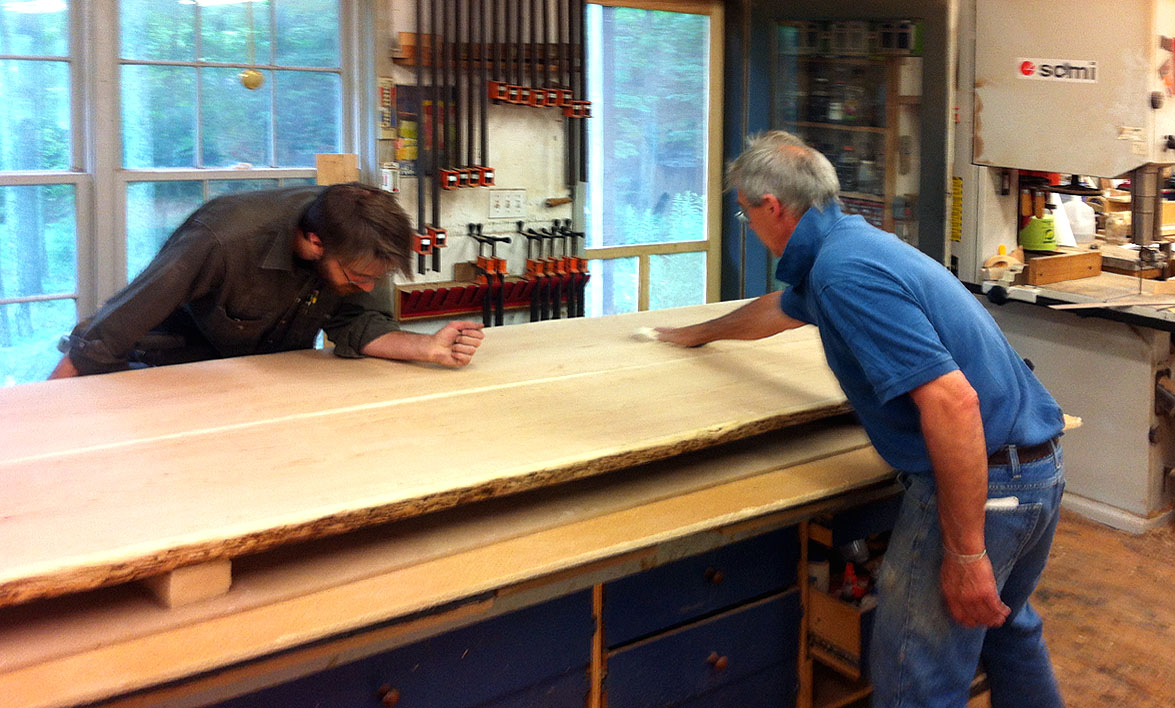
12/23/10 ... We worked for half a day today, assembling the big panel and final fitting the steel, box beam parts and the 16' face board ... except for completing the half round moldings and the shadow piece below it on the long board, the island is ready to final sand, disassemble and finish ... just in time for party time .... Long weekend coming up ...

In this picture, you can see that we've installed a few of the oak crosspieces (more to go but we ran out of time and long lags) that make up the box beam, (see note below) that stiffens the steel, that straightens the 16' oak piece, that supports the overhanging granite ... It's all connected and rigid as can be ...

Panel glue up ... we didn't have any 15' clamps but this system worked just fine ...
Update 12 21 2010 .... We worked out straightening and supporting the 16' oak face board on Friday afternoon and today we disassembled the cabinet and jointed, planed and sanded the long stock for the big back panel. We had made some matching dollies last week that will allow us to reassemble the cabinet on wheels to check the length and the fit of the miters on the long pieces before we begin the finishing process. The plan originally was to finish it on site after delivery, but now after we make some finish samples later this week, it's likely that we will do the finish here before delivery ... The concept is 'slightly distressed, warm, red-brown, darker than the medium red brown reclaimed oak flooring'. It's going to look sharp ... click the photos to enlarge them ..

We've got a 1/8" wall, 1 x 3, piece of rectangular steel tubing screwed to the column tops to support the granite counter where it overhangs the cabinet back by 13". There will be 6 connecting pieces of 2" oak that will be bolted through the cabinet backs and the big panel, into the steel that will create a sort of
'box beam' to stiffen and straighten the whole structure ... I love rectangular tubing for it's inherent strength and straightness ... I could stand in the middle of that 15' span now and the tubing would only deflect a little. With the bolted cross blocks and support of the oak face board, it will be more rigid than necessary .. Simple, quick, strong, efficient ... All good ...

Here's the set up for straightening the boards .. you can see on the left how 16' pieces of quartered oak go through the drying process. They don't like to stay all that straight. Rather than try to straighten the long boards on the shorter jointer, we set up a 16' mdf straight edge and screwed it to a chalk line on the back sides of the boards. Then we cut the straight line using a skilsaw ... Slick ... one pass ...

The center piece sliding out for dis assembly this morning ...

Trevor and Jim surfacing the 16' lumber ...

The cabinets nested by the bandsaw ... It turned out the only thing we had to open the door for was to run the boards through the wide belt sander ... Good to go ...
Updated images 12/12/2010 ...

If you've been following this post, I'll write more later ... This post has been removed from typical chronological order by request of the client .... I'll continue to update it though as we progress .... Click the photos to enlarge them ...

Friday we put the pieces all back together and brought in the 16' lumber for the back side ... We had to sort of use our imagination as to how things worked themselves out between the turned columns there... There's a dishwasher on this side and cabinets with regular toes paces on the other side ... How to make it all work ... I think we've got it here ... Tomorrow we'll start the long panels and the long undercounter face board on the other side.. We're planning to put all the cabinets on dollies until we deliver so we can get the 16' stuff through the table saw, jointer and planer ...

12/8/2010
Well, I wish I was on the big island in Hawaii, particularly after last night's snow, but I'm not ... I'm here in my shop and we're
building a big island in quartersawn oak ... 16' x 4' ... 8 turned, 6" diameter, 3/4 columns , with a granite top. It's a big one, but fairly straightforward once you understand what's happening and get it all laid out. We do have to move it when it's finished however, so there has been some thought that has gone into that. This will be a longish post as some of us have been working on this off and on for a couple of weeks, but, except for a brief moment when we put the three main cases together to check the final dimensions two weeks ago, it's been just a bunch of pieces stacked here and there throughout the shop. We got it all together again today and you can click the photos to enlarge them as I work my way through it ....

The photos at the top shows the working side of the island. Above is a view of the end panel without its cornice. The cornice has a bead molding about 2" up from the bottom and we will use the dado for that to attach the cornice by screwing through under the molding to the supporting framework you see in this photo ...

The plans were excellent and we started by coloring the various elements on the main drawing (above) ... the cornice, the face frames and paneling, the ply boxes, the applied stuff, etc., so that we could more easily digest what went where ...


These excellent cad drawings show the front and back elevations, the plan view and areas where individual sections are shown in detail ...nice !

From those drawings, we took the measurements for our boxes and assembled them one time to check the final dimensions. We couldn't leave them set up and easily still work so once we figured it out, we disassembled and stacked the 3 sections to work on the parts. We also discovered when we did this that we had to make a perfectly flat and level 17' area to mimic the (I'm certain) perfectly level and flat new floor where it will be installed ... Fortunately, it required only about a half hour and two hydraulic jacks in the cellar below to take the sag out of the joists on either side of the main girder of the shop ... All set ...

Trevor then made up the face frames and applied them, and then went on to the drawer and appliance faces and doors ....

Will made the drawers and got them all in place.

In the meantime, Jim and I glued up the six inch +, x 32" long squares for Will to turn .. There was no quartersawn oak thicker than 8/4 available that I could find so we had to glue them up in two layers ...

Interesting project ... they took longer to glue up than to turn in finish ...AND they weighed on average 32 lbs each when they went on the lathe .. Hang on ... The first couple created just a little anxiety for Dad...80 pounds of sawdust when we were done ...

Will quickly roughed them out with the duplicator
(See this previous post) and then hand turned them to finish them ....

And Jim and I cut the quarters out and made the square tenons on the ends on the bandsaw ...

With this jig, the column is aligned with the section that you want to remove showing. The first cut is made and then the thin screw on element is removed, the jig is rotated 180 degrees and the thin element reattached for the second pass over the saw that removes exactly 1/4 of the column ... We all get gold stars for figuring this one out ... The tenoning on the bandsaw was quick too and I'll post some photos of that at some point ...

Ta Dah ! Looks easy now that it's done ... and actually, it wasn't too bad considering. A brand new 'heavy duty Freud industrial 28 tooth specialty rip blade' was the key to success.

And today we reassembled everything. We have had some trouble locating 16' quartered oak for the paneling and long face board but it will be arriving just in time this Thursday ...

We set up a couple strings, one for straightness in the horizontal plane in this photo and one in the photo above that runs along the back to straighten the back of the cabinets to get ready for the long panels ... Now that we are Level, Straight, and True, we can now fit and attach the cornice pieces, hang the doors and apply the drawer faces and know that when we get on site things will be good to go. This cabinet sits right on the floor with (probably) an 1/8" shadow below it so as long as everyone's level is the same we'll be all set ... I'm confident ... The builder is very good ...


 we were there to look at the available colors and give them a heads up that we would need some pretty big counters ... the one on the right will require a piece about 6' wide and 7' long with some angles, sink and faucet holes and a custom made 42 x 21 x 12" deep matching slate sink. the one on the left, about 50" x 100" ... no problem ... just bring your checkbook ... more on the kitchen soon ...
 we're underway, site check today ....


 well, what's happening here this past week you ask? where to even start? it's a busy time and there is a lot going on. click the photos to enlarge them ...