Sunday, April 29, 2012

a hanging chestnut swing

 well ok, this was a fun one ... this week we'll deliver it to the walnut trestle table house we visited back in december.  we've got a curved project coming up there, so we'll get to check our templates for the next project while we are there.  click the photos to enlarge them.

 we started with an inspiration photo from our designer client, jennifer palumbo interiors, of newton, massachusetts, which we translated into the drawing above.  it looks pretty straightforward, but has the classic 'three way intersection' joinery challenge, coupled with an outside installation situation, and the ability to seat three (at least) people.  so, we had some serious, long term structural considerations.  we chose reclaimed chestnut for the wood as it has a reputation that in outside use, it last 'two years less than stone'.  in fact, i have some chestnut fence posts in the woods, by the corner of my property, still sound, and surrounded by 65 year old trees.  good enough for me.

first set of corners was easy.  bridle joints on the table saw all around.
                                   
i made a sample corner, which i later changed to a square tenon on the ends of the crosspieces, and inserted 1/2" x 6" stainless steel hanger bolts through the bridle joints, with stainless washers and bolts securing them.
the assemble corner sample
                                   
the brain storm was using the assembled bench to drill the pilot holes for the hanger bolts.  by carefully drilling centered holes in the corners of the end assemblies with the pilot bit on the drill press, i had a guide for drilling the 3" deep pilot holes for the hanger bolts.  i then disassembled everything, drilled the holes in the ends sections large enough for the hanger bolts to pass through, reassembled everything, and inserted the hanger bolts with the bench already put together.  otherwise, it was almost impossible to get those 6" long bolts in straight. 
lots of mortising and tenoning later, we had the bench below.
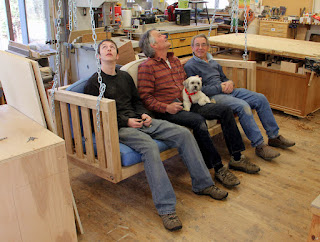
  we hung it in the shop and grabbed some cushions from the lounge chairs in the office and had a swing.
  the springs and hardware gave the whole deal a wonderful feeling, even with three of us and will's dog in it.  be sure to check the video ... it's one of our best.
the finished bench color with the sample of the rough sawn siding

the custom forged steel swing hooks that sam made for this project

Wednesday, April 25, 2012

real spring, 4/24

 
 real spring is here !! after a pleasant, but strange, 'fake spring' back in march where the temp went up into the 70's and 80s, now it's really real spring.  the leaves are just starting to pop; the asparagus are up and we're eating them; the crab apple tree went from greenish to PINK in 3 days.  and, we've had some serious rains a couple days apart to get the streams up for sam, the fisherman in the family.  click the photos to enlarge them.
 this display only lasts a day or two, but it's cool when it's up ...
                                    
  the toads are back and singing, and laying  millions of eggs in kit's pond ..
 there's a little shelf holding up the air conditioner outside the metal shop where mrs. robin makes a nest.  she was starting to build on top of last year's, which can be messy and risky, so kit whisked away the old nest and temporarily set it on the top of the grill ... it is an exquisite object, perfectly round in a way that's hard to imagine a bird pulling off.  the clay and grasses are from the edges of one of the ponds, and then the fresh grass lining in the nest below ... perfect ...
 kit think's she'll lay one more today and then start to sit ... beaurtiful !
and i finished stacking next year's wood yesterday ... earliest ever.
and sunday, we did some spring cleaning.  borrowed an 8 foot step ladder, vacuumed off the ceiling fan, the top of the entryway closet and washed the insides of the velux windows !!!  wood heat can be messy, but with oil at $4.00 a gallon, i'll take the mess thank you ... i'm getting the hang of the new blogger interface, but it's a bit of a struggle ... grrrrrr ... i do like how fast the pictures enlarge when you clcik on them.

Saturday, April 14, 2012

a studio style console table


   will has been working on this studio style console table/sideboard for one of our midwest clients. wwe made a coffee table for them back in 2003? or so and after going back and forth on woods, colors and designs, we ended up with this design, a slightly contemporized version of a sideboard from my own house. it's a classic example of our 'studio style' and below you can see it go from conception to completion ... click the photos to enlarge them ....
start with the legs and mortise them and fit up the tenons on the frame parts below ...
than add the dust frames that the drawers ride on ...
fill out (shim) the sides to keep the drawers running straight ....
add the knife hinges for the center doors ... we went back and forth on other hinge options but while these are the fussiest and most time consuming, they also are the cleanest and least obvious ...
lots of pieces ...
make the top and add the inlay and the breadboards ends ... wow .. these pieces have a really lot of work to them ... they seem so simple when the are finished that i almost invariably underestimate them somewhat ...
here will is gluing up the case and preparing to add the ends. the interiors are shellacked and waxed and ready for the final fitting of the drawers and doors .. wrapping it up soon ...
love the hat ... i ended it up with it after my father died. my uncle picked it up for him on one of his road trips. mosheim market was/is? located in mosheim tennessee, small town likely named for one of our unknown mosheim ancestors ... there aren't many of them that i know of ... a branch in argentina, one in austria ... i remeber in the 80s that my uncle said they 'gave him the keys to the city' as he was the only mosheim in anyone's memory that had ever come to town.
ok .. home stretch today ..
we made several photoshop mockups and cad drawings to help the clients visualize the space .. more on that later ...

here are some shaded cad drawings showing a few different possibilities, and above, the finial cad drawing ...

visualization, model making, and digital fabrication, classes 2 & 3

saturday was the last class for my green mountain college students above. i thank trevor for helping me to pull this off. i had no idea teaching a one credit course in something that we do all the time would be the challenge that it turned out to be. of course, i didn't anticipate on the fact that both trevor and i would have to learn at least the basics of importing files from the 3d program google sketchup to our toolpathing program, or that since these weren't our ideas, in our language, we would have to get into thinking about their projects from their points of view ... anyway, we made it through and got all but one japanese puzzle box project pretty much finished. i think we all learned something ... i for one, learned that 15 kids in a class with five different projects is fun, but a lot of work ... i had to have a nap when they all left ..click the photos to enlarge them ...
chessboard concept, above and below
during the second class at gmc, we got to see and use lucas's 'one sheet design tables' that we cut on the cnc for him back in january ... (scroll way down) .. they worked great, both as singles and arranged in a block to form larger work areas ... very clever design .. the photos above are from the second class on march 24th at the on campus design studio. in that class, the groups finalized their project choices and they all worked up a rough cardboard mockup that explored their paper based ideas. that was funand while we were there, we got to see another design class project ... i forget the technical name, but it is on the line of the 'micro houses' you may have seen in the news .. very cool ...
i wish i had had more time to take photos as the models progressed, but i didn't ... the group above learned that they had to do a little more research on angles and dimensions for comfortable seating ...
and the boys above had to do a little more research into lighting ...
there were adjustments on the fly that trevor handled with ease ...
the puzzle box required some fussy assembly and we came up a little short on getting that one working ... we'll make some revised pieces and send them up so it can be finished ...
i'm pretty sure a good time was had by all ...