Saturday, February 23, 2019

repairs, and why we like them

above from the book 'the craftsman' by richard sennet 
i've been catching up on my reading lately ...
click the photos to enlarge them
so, last week i had a small run of repairs,
bringing things back to useful life
i got the chair in the first photo above with the missing parts
in a nice cloth grocery bag .. first step was to reglue
the backsplat and get it ready to re install
here it is, all set to go ... 
this was what i refer to as a 'functional restoration'
where the object is reassembled using the guide line
'if it doesn't make sense financially to fix it correctly. fix it any way you can'.
a 'proper' restoration was not financially feasible, yet the repairs
i did here will extend the chair's life, (barring catastrophe), for the foreseeable future.
and then something comes in the door that just blows you away
yowza!
details, detail, details ... nice black mother of pearl in the peacock's tail
and i love the details on the metalwork .. that alone probably took a couple of minutes
the client inherited this chest from her aunt who collected 
chinese 'stuff' .... i can't imagine who commissioned this one ...
and let's not neglect the back ... i think they threw the 
angles and curves in just for fun ... 
another painted chest required some adjustment and repair to 
the little stubby legs, which may or may not have been original .. 
FUNKY CHAIR !! obviously a green wood construction
check the warp on that seat .. quite a twist!..

point of interest here, after cutting off the front leg a bit to relevel it,
i noticed that the leg was turned from what appears to be a branch, with
the heart included in the turning .. never saw that before .. my guess is circa 1800.
better view of the warped seat
note the fact that the left leg in the rear and the opposite leg in the front
were shortened by at least an inch each .. 
and then we get to my friend Tom's 'music chair'
which he has been sitting in to play his guitar for a good portion of his recent life.
when it arrived, it had three snapped off tenons, one on the top of a leg, two stretcher ends,
and a long spit in the center stretcher ...
the leg top i was able to drill for a 5/8th" oak dowel new tenon, but the stretchers
required turned and scarfed on new tenons with small screws reinforcing the joints
from the bottom of the stretchers.  tom's my age, the chair's quite a bit older,
and we'll see how it goes.  i am hopeful ...

and below, from a previous restoration blog post i wrote a few years ago about repairs ..
that blog post has a link to a new yorker article on
the conservation studio at the new whitney museum ...
the new yorker article is a thought provoking read on art and time passing ...

Monday, February 11, 2019

a studio style desk

people ask me all the time now 'so, what are you up to now that you are retired?'
actually, i am not 'retired' per se,
but TOTALLY enjoying working in the shop by myself, organizing my
tools and supplies, jigs and fixtures and making new pieces.
this recent one is a  perfect example of the kind of project i enjoy.  
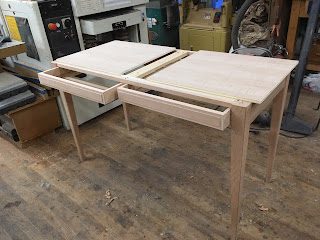
it's a desk, 22 x 48 x 29 in what i refer to as my 'studio style'.
if you click that link, you will get many blog posts and more of a history 
of the style i am referring to ... there have been a LOT of those pieces ...
tip of the iceberg above ...
close up here, with the quartered cherry figure showing up 
in the hand planed bevel on the edge of the top ... 
coincidence yes, but a beautiful detail ..
this piece has a lot of the nice woodworking challenges:
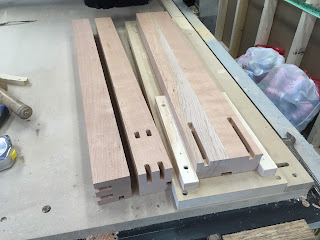
mortises and tenons
dovetailed drawers
inlays
proportion questions
just a bunch of nice processes to work your way through,
i see it as kind of an exercise in craftsmanship
start with a drawing
most of my guys in the shop in the past would have used
our JDS multirouter to create the mortises in the legs above.
but since i am learning a new tool pathing program for the CNC,
i decided i would do the exercise ... after a bit of a struggle,
 i reeled them in ... very fast, and no measuring or laying out, now that i've got 
the process down.
next up, taper the legs ... new style taper jig
create the angled rails and tenons
dovetail the drawers
make the inlay block and the individual inlay pieces.
i actually had to figure that out too as i personally hadn't 
done any for a long, long while ... i wrote down and illustrated the inlay block 
add some aniline dye and some black milk paint to the legs
and apron borders, glue it up, fit the drawers, and send it to connecticutt.
the woman who ordered this one, bought one just like it from me in,
i think, 1997.  this one is for her grandson ... 
warm and fuzzy feelings here ... 

Wednesday, February 6, 2019

make yourself some edge inlay

click the photos to enlarge them ...
back in  the mid 80s i started adding inlays to my designs in an attempt to stand out from the
crowd of shaker style furniture that a lot of the makers were putting out there then ...  
get yourself a problem ... figure out how to solve it .. fun!
you'll have to scroll through a couple posts at that link to see the edge inlays described here ..
this photo shows the last stage of the process.  the blank has
been made and cut into strips. the edge of the top has been routed
and i just have to neatly glue them all in and flush them up.
add a little finish and send it on its way.
update ... see the end of this post ... 
well, it has been a while since i personally made one of these blocks
and i was fortunate when i recently edited the shop to bundle up
these gluing jigs and put them in the cellar, and lucky to find them 
yesterday when i needed them .. it still took a little head scratching
to get the job done.  once you decide the design, and the options are 
infinite, the first step is to make the center block from alternating 
strips of different color woods. in this case, ebony and hard maple ..
the first jig requires a bunch of clamps and some elmers white glue 
for a long open time
the blue clamps squeeze the strips together, but you have to do a little dance
where you clamp them flat lightly, then squeeze em, then clamp them flat
a little tighter, then a little flatter .. back and forth .. you get the idea ...
next you have to smooth the glued up center section.  the 'meat' of the sandwich ..
you can do this with out a wide belt sander, and i did a lot of it 
before we finally bought some real tools in 2001 ... in the photo above 
you can see the bit i use to rout the edge of the table. it's best to
do that before adding the thin top and bottom strips so you know 
how thick you want the block to be once it is glued up ..
next make the top and bottom pieces, the 'bread' ..
i generally shoot for a thin 3/8ths for the center section,
and a big sixteenth for the top and bottom layers
then you want to squeeze the whole thing together between some
blocks coated with non stick tape and as many clamps as you can fit ..
once that sets, you've got your block and you just need to set your
fence to the right thickness. the maple board fits over the inlay block and
pushes the cut strips through to clear the blade.  repeat ... insert video here ,,,
2/7 ... all glued up now .. first coat of finish is on the bottom of the top ... 
a few steps to get there ... 
sand the ends of the strips so they mate and the corners are mitered ..
add glue and masking tape
scrape and sand it smooth and flush with the cherry
drag out your box of odds and ends pieces and reflect ... 
the cherry and black paint and inlays is actually what i have
referred to in the past as my 'studio style' ..
blast from the past! ... lots of old portfolio photos at that link ..
all for now ..
.