update 9 22
one more and a tv to go. the painters just placed them on the cleats and in the notches, we will glue them to the cleats when the last short shelf has its last coat of paint.
so ok, this was an interesting project. it's in the same house that we've been working on with the kitchen and the vanities. there are designers from florida involved and when they were last here, they spied a beam in the driveway that they liked. it had been removed from the original house during the remodel and we picked it up, took it back to the shop and scrubbed it off.
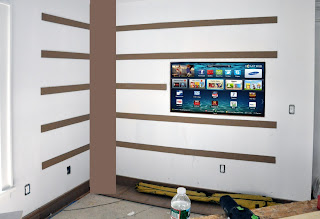
their idea was to place it on an angle, in the corner, and have thick shelves fitted to the existing notches. kit came into the shop while we were working on how to attach it to the floor and she said .. 'cool ! a totem pole ! '.. appropriate i thought. we taped three inch cardboard to the wall to get a feel for the length of the shelves in the space and then photoshopped the beam into the picture ... then we were ready ..
this is an early drawing. once we saw the cardboard, we extended the shelves on the left ..
the only way i knew to do this with no support on the ends is called 'torsion box' construction. essentially, you create a hollow honeycomb structure and when the top and bottom are glued to the frame, an absolutely rigid, stable shelf is created. you leave a hollow 'pocket' in the back of the structure for the cleat that goes on the wall and then glue the shelves to the cleat and prop them temporarily in place. next day, remove the props and voila! rigid, unsupported shelves. i once made a set of these 12' long with no supports on the ends and when i came back to remove the props the next day, the owner had beat me to it and loaded the entire 12' top shelf with encyclopedias and art books .. shocking, but no sags or calamities. it's a great technique.
to start, you need an absolutely planar substrate like the 3/4" melamine below. on that you fabricate the grids with no glue using staples on the joints. then you glue the tops, bottoms and mitered edges on. since these were too long for our veneer bag, we used cinder blocks for pressure while the glue was setting. worked fine.
we had two melamine spots so jim could work on the frames while i laid up the tops and bottoms and fitted the edges.
i did the bottom first, then the mitered edges and ends, then the top last.
it took a lot of mdf to make the grids and tops.
one more short one to add tomorrow and we turn them over to the painters. they are actually pretty rigid, even without the glue. level square, plumb and true ...


1 comment:
Nice technique. How far proud of the wall do you find the cleat needs to be? Those shelves must be very heavy, and only glue holding?
Cool.....
Thanks,
Dave
Post a Comment