Showing posts with label expanding table. Show all posts

Tuesday, March 29, 2022

a walnut dining table with a leaf

we shipped this one off to Florida last week ... natural walnut,
54 x 88 closed, one 20"" leaf .... 
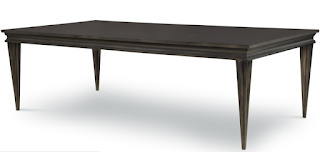
                        This was the inspiration photo sent by the client early in the negotiations…
                                       So we started with some nice walnut from irion lumber
                                                and some poplar for test pieces

and a new cad drawing
we had a little back and forth on the apron details, but we got it
and we ordered a new custom shaper knife to cut the profile in one pass
ta dah!
it took a few shots to figure out the cnc work on the leg, and 
get the profile exactly the way the client wanted it,
but we finally got to a place where we were all happy
the top was pretty straightforward with the fine wood from irion lumber
time to get it all together
we finished it up, and off it went to florida ...
and we didn't hear a peep for a month or two. one day Kristian
asked if i had heard anything, and i hadn't.  then, i kid you not, later that day
i got some photos, and one of the nicest emails about a piece of furniture
a person could hope for ...


all for now

Saturday, December 18, 2021

(another) custom walnut dining table

 well, it's saturday, it is snowing pretty hard, the music is good,
 and i am thinking of having a beer .. 
i'm on a roll with the blog posting, two so far, so here's another ...
i've got my beer now .. here we go ...
there is our inspoiration photo from the client, and our first mockup 
using the tooling for the apron we had on hand. the apron knife i used 
was one i had made previously for big cove moldings and pencil trays ..
not perfect!  we had to have a custom knife cut based on a section of an angled oval ...
once the knife arrived, we ran em ... no problemo
we used some nice walnut from irion lumber,
5/4, 6/4, and 16/4 for the legs ... a couple thousand $$ of it .. 
54 x 88 with one 18" leaf ... pretty big table!
next we used what we refer to as our 'holes and pins' jig ... 
it never fails to line everything up
drill bushings from mcmaster-carr
center aligned ... good up to 6' diameter tables
drill one half one way, the other, the other way .. 
one of my handiest jigs ever ...
where was i?  oh yeah, attaching the legs ...
we devised a sort of complicated pair of corner blocks, 
for each corner, pocket screwed to the 6/4 aprons ...
the top and bottom blockes were, in the end, connected with pieces
of 3/4 ply that were later screwed to the vertical square tenon on
the top of the leg. we also included a 2.5" #12 wood screw 
down through the center of the top block.  a very rugged connection
considering the deisgn ...
kristian ran the fluted details on the cnc using a 1/2" round nose bit,
many passes, on 1/16th" centers perpendicular to the center line of the legs
hard to describe til you see it happen .. 
it took about 6 minutes per flute, four flutes per leg
it took 3 tries to get the leg design approved .. i think if you blow this one up
you can see the tool paths on the poplar test piece
so there you have it, upside down, and ....
 right side up ... headed to tampa sometime in early 2022 ...
anothe challenge, for sure!

Friday, February 22, 2008

A Round Expanding Table

4/7/08 ... We finished this one up a few weeks ago but it's not leaving for a minute and I just got around to taking the pictures and adjusting the photo images. Great project. As usual, more complicated and more pieces than I thought, but a still a great project, nonetheless ..... Click to view ... Story below ...


The finished table in the closed position


With the four 18" leaves

Underview showing the concealed leg and the runners ...

2/22/08 We started the design work for this project back around Thanksgiving and we're now well on the way to wrappng it up. It will sit in the formal parlor of a fine, vintage 1840's, Philadelphia townhouse. The photos are posted from conceptual work through the present in reverse order with the most recent at the top. Double click the photos for better viewing. The table is built using figured mahogany and will have black painted details and ebony and burl inlays. It will be a 39" round in the closed position and will open to 112" to seat 10-12 comfortably.

3/15/08
We were about to apply the final coats of finish to the table top when I realized I HAD FORGOTTEN THE ABALONE TRIANGLE INLAYS !! It was kind of nerve wracking inlaying them into the nearly finished top, but they came out fine and are definitely a nice, eye catching addition to the overall design ...

INlaying the triangles process....
Outline

Rough rout with 1/16th" bit
photos above show the marking, routing and hand fitting inlay process

3/9/08 ... Close up of the top with the completed edge inlay, ready for final stain on the mahogany.

In this picture, the pieces have been firstcoated with stain and the inlays have been masked off in preparation for the final color on the mahogany. You can see the finish sample of the final color in the foreground and the black apron details nested within the leaves. the other black column details and moldings are in thefar background. All of a sudden it dawns on me that there are A LOT of pieces in this table.

Inlaying the edge detail.

Showing the length of each piece of edge inlay.

2/27/08 We're now working on the burl center inlay for the main table and for the leaves. The small half circles we can glue to the table with clamps , but the leaves will go in a vacuum bag press so the the larger area (11 x 18) can be clamped with more consistent pressure.

Fitting up the pie shaped pieces of the center inlay.

Clamping the fitted inlay to the table.

Fitting up the inlay for the leaves 2/27

The table as it is today 2/22 with a photoshopped on apron and painted molding detail

My son Will, rough bending the inlay pieces for the circlular ebony inlays with a shop made 'hot pipe'. He could, with just the hot pipe and careful control of the heat, bend the kiln dried ebony, or most any other thin wood, into a radius slightly larger than the pipe itself. We learned this technique from the guitar makers catalog, how to books, and a little experimenting. The .35" burl line is cut, not bent.

A close up of the inlay process. This is actually the third step, as each layer is glued in, one piece at a time, using the nails to temporarily force the pieces into place until the glue dries. The blocks for the edge inlay are in the backgroound.

End view of the whole table with the triple outer inlay border (ebony/burl/ebony) set.

The table in the open position, without its center leg

The split pedestal with its center leg and shop fabricated column locking mechanism

Gluing up the tapered column

Checking the column piece cutting jig with an mdf mockup


Sketches of possible inlay designs...First table, top left is the one we're building.

The parlor with the proposed table photoshopped in

The parlor patiently awaiting its table