
well, ok. i've been putting this one off for a while, i've been kind of taking a little blog vacation for a week or so while trevor moved this project along. it's a new version of the table above that we built back in 1991.
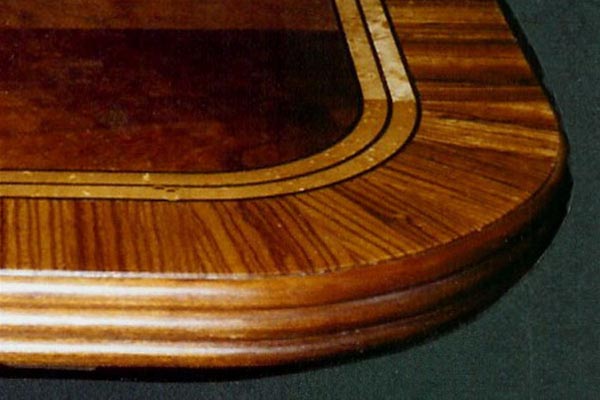
this is a close up of the original edge inlay on that table. it had a triple band of ebony, a double band of birds eye maple, and an outside band of zebra wood. the original table we made using about 30 detailed photos with measurements that our client took while he was visiting england. he did a great job showing the details and we had everything we needed once we figured out how to do the many, many, individual steps. so, since i didn't take many notes originally, this time i thought i would document the process, just in case there is a next time in another 20 years or so. by that time, my memory will most likely be completely shot. click the photos to enlarge them.

these clients wanted a smaller, simpler, version, 42 x 84, with no leaves (fortunately), and a simplified edge detail, so this new table was a little simpler.


the first step shown here was the use the big straight bit to cut the flats.

next was a smaller, longer straight bit to hog out most of the dovetails.

finally. the dovetail cut itself, cut in one straight pass. trevor used a couple of different router bases so he could leave the stops set the same in each case. he then put the dovetail bit in the router table and machined the tails on the legs to fit the routed slots above ... i missed photographing that set up ..

above are the rough assembled finished pedestals with their top caps that give the pedestal its stability when they are attached to the table top.

but first we had to shape the top edges, which involved several steps and set ups.

the first cuts involved making some holders and using a bearing on the top to guide the shop made cutter (found that too) i made back in 1991. amazing. this is all so NOT a testimony to my organization skills, but rather our extreme and deep good luck. you know ... "lead a good life and the rest falls into place" is a saying that pops into my mind for some reason here ...

second step after the center shaping involved this other shop made cutter ... found that one too !

third step ... a hand held router with a round over bit and a non standard bearing ... lucky we had one that did the job ...

and tah dah ... good to go.
 on to the top ...


surfaced flat on one side on the cnc, run through the wide belt sander, jointed and planed and glued up

now this is a total luxury i did not have back in 1991, our cnc router to cut the top with its rounded corners to shape. hmmm, looks like i missed a photo of the edge beading bit ... we had to order that one and i can't find the exact bit on line, but it looks like this one except there are no flats between the beads and the bit comes to sharp points between the beads .. i think it took just one pass to get it looking like the photo of the edge detail below.

by cutting into the spoil board an 1/8th" or so when he made the first cut to shape, trevor was able to replace the top exactly in the same spot on the cnc after he ran the edge beads. he then cut the rabbet for the burl and walnut edge on the top, a much simpler detail than the original table.


here's our sample edge detail we sent a photo of to the clients for approval.
setting the 'max depth' for routing the rabbet for the edge pieces.

good to go. if you're still with me, hang on, there's still a ways to go ...

start with the 1/8th inch walnut string, glued and held tightly against the edge of the cut with headed brads that are removed once the glue sets.


home stretch

all done, ready for final scraping and sanding after the round cornered aprons are attached. more on that detail later ...

well, trevor's dovetails fit nicely, but we still like to clamp stuff when we glue it up.

so we devised this 'glue up jig' and cut it on the cnc from a cast off
spoil board, which is the sacrificial mdf top under what you are cutting
on the cnc .. cast off spoil boards are great for jigs and stuff ... this is one cool object that we're planning to do something with when we are done gluing the pedestals.

holes all the way through at the ends of the legs for clever wedges, made on the sander, to tighten things up ...


i know i didn't have this figured out first time through in 1991.
set it up and check it for level and plumb on the table saw after wedging and clamping it ... more tomorrow. you need a break by now, and so do i ...


finished table below .. click the photo to enlarge it
all done !!
3 comments:
What a handsome table. I wish I had space in my shop to make something that big. :)
I like this stylish table..I like it..
dan this blog is very enjoyable, learning so many things, love this table,having that cnc sure is handy, otherwise..:)...bob
Post a Comment