Showing posts with label antique repairs. Show all posts

Saturday, July 29, 2023

repairs and restoration

 i had a chat with a friend about 'repairing things' recently ... 
we have done several repair projects, for several different clients, 
and after our chat, i sent him this link ...

it takes you here ... 
click the images to enlarge them
 there are 34 separate posts on my blog about us repairing stuff.
it is an interesting and often fun and rewarding part of our business.
after i sent the link off i actually took the time to cruise through
the various projects, some of which i scarcely remembered.
these projects tend to come and go quickly.
and below are some excerpts from other writers' take on the process ...
so true here
below are some images selected from the link above
showing some of things we have fixed in the last 40+ years ... 
rereading these posts this rainy afternoon has been quite a trip for me ...
it's a long story
with a happy ending  
and how about this one?
we didn't have to do much, but it sure was fun having it here for a bit
someone spent some time on this one
and we spent some time on the one below
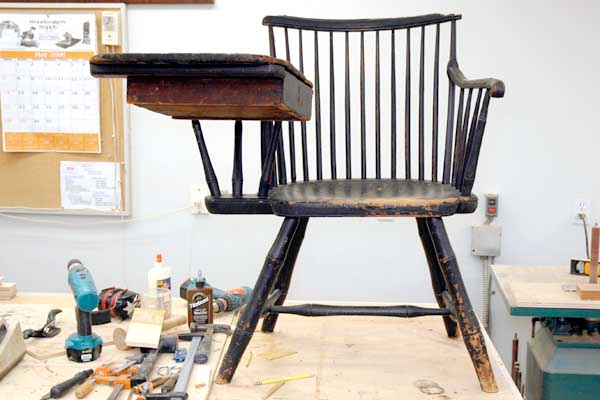
one of the finest writing arm windsors i have seen
all the original pieces were available
tah dah!  all in, all done
one more ...
we had to reattach the top to this 'papier mache' tilt top table
with the little scraps of abalone inlays in the oval border ...
who even knew there was such a thing?
ok, last one  scroll down


Tuesday, August 5, 2014

a fun and challenging repair

very presidential
 
well, we had a couple chuckles today .. we finished this repair and i was taking a quick record photo and caught jim in the 'dollar bill' pose.  lookin' good in there, don't ya think?  anyway, the orange lines in the photo denote all the places this piece was broken when we picked it up .. it is a family heirloom that was standing quietly in the owners' garage just after arrival, when the arm thing on the top of the automatic garage door just nicked the top and tipped it over on its face as it was closing.  small disaster .. all better now.  click the photos to enlarge them ..
it took a few clamps and a bit of fussy work to get everything lined back up and reglued.  it also required some imaginative clamping fixtures due to all the holes and rounded edges ... we got it though and it looks 'good as new' for an antique.  these things must have been really popular at one time cause there are about a million different pictures of em on google images.  check it out
seriously, a half million at least ..


looked great in it's home place
it even had a pair of sweet cast bronze, mirror image scallop shells for the base .. very cool ..

Wednesday, April 20, 2011

tick tock, an aaron willard clock

4/12/2011vvi spent parts of the last couple of days reconstructing the base of a client's aaron willard tall case clock ... aaron died in 1844 so it's been around for a while ... i love a good repair. they are challenging and engage the creative process in powerful ways ... like a good puzzle, you can, and often have to, work on them over time, allowing your concentration to wonder off to other more pressing things ... perfect for the ay dee dee mind ... click the photos to enlarge them ...
my client emailed to tell me that one of the the 20 pound weights that drives the mechanism had snapped it's string (or, as it looks by the red arrow in the photo above) or the weight's hook broke. regardless, it crashed to and through the floor of the case and smashed the base of the clock ... it was easy to see upon disassembling the base that it had been poorly repaired several times in the past ... just cleaning the clots of glue off the pieces was a real challenge ...
everyone else in the shop was doing their thing and as this was an unexpected project, i squeezed it into my work week, working a couple minutes here and a couple hours there until today, it was 'back on its feet' ... ha ha ... above i started with the biggest piece and did some small glue ups to the obvious pieces monday ...
tuesday i puzzled out the side pieces and added back a few missing pieces
planned my strategy ...
until it was ready to go below at the end of the day .
wednesday i added the sides
and clamped the front feet to the rest at the end of the day
this morning i added the back foot supports and the missing glue blocks
and it was ready to go .... somehow, and it is still a mystery to me why, i needed to add a 5/16ths shim to the front right foot and an 1/16th " shim to the front left to get the case to sit level and plumb ... i measured all four feet; all were 3" tall ... but i knew it wasn't a new thing because in the container of broken pieces there were two newish shims with my handwriting on them that i added to level the case when the clock originally arrived several years ago ... now they are officially attached to the feet ... the last thing i have to finish tomorrow is to fit up a new brass piece that was missing in action ... fortunately we had some 3/16ths x 1/2" stock on hand and with a little patience tomorrow, it will be fitted up and in place ...
we'll deliver it next week and meet with the british clockmaker, ray bates and/or his son sometime soon to fix the weight and set the works and bonnet properly ...
in closing, i can say that a good repair to a worthy piece is a fine thing to take on ... there's the challenge to execute it properly, to get it to look right and function correctly, and to change what you are working on from 'not so good' to 'good for another 100 years' ... most rewarding ... and, highly recommended as a study of classical construction methods ...
all done ...
4/20/2011 ...
the clock is home now, in this beautiful room ... we made two pairs of the fancy old glass doors for this same room a few years ago. i started a blog post about them but the process was soooo complicated, it was, in the end, undescribable. at least for my writing ability ....

the worksthe dial

Thursday, October 23, 2008

Remodeling an English Breakfront

This Just In


All Done 10/24

We met with a client recently who asked us to remodel an antique breakfront that had been in her family for a while. It is a nice example of simple, classic, 19th century English cabinetry. Frame and panel English oak doors, with a pine case, cornice and interior. Her request was to put the paneled doors in the center where the glass was, (flat screen tv moving in) and move the glass doors to the outside. This would have been easier if all the doors were the same size, which, unfortunately, they were not, the paneled doors being 3" narrower than the glass doors ... We had at it anyway and should finish tomorrow sometime. I'll let the pictures tell the story ... Click to enlarge ....
The cabinet as we found it

Doors off .. shows early "adjustable shelf" detail

A disassembled door waiting to be cut down, re-coped and reglued

My man Jim, heating and chipping off the ROCK HARD old putty after he knocked the doors apart with a hammer and block. He was able to save all but two of the unbroken wavy glass pieces. Fortunately, we have a small stash of old sash with similar glass.

This photo, when enlarged, shows the pieces we cut off, the shaper set up for recoping the cut rails and muntins, and the contoured backup block ( a negative of the molding and rabbet shape of the muntin and rail profiles ) we made so that the coping cutter does not blow out the existing molding. When making doors like this, it's best to run the cope on the ends of the rails and crossbars before we add the molding detail so we can skip this step usually..

The clamped up doors with the newly coped muntins and rails, note the old protruding tenons ..

Where we are today ... 10/23
We should be able to recut the old glass and reglaze the 'new' doors tomorrow, polish the whole thing up and send it on its way ....