Showing posts with label furniture repair vermont. Show all posts

Saturday, July 29, 2023

repairs and restoration

 i had a chat with a friend about 'repairing things' recently ... 
we have done several repair projects, for several different clients, 
and after our chat, i sent him this link ...

it takes you here ... 
click the images to enlarge them
 there are 34 separate posts on my blog about us repairing stuff.
it is an interesting and often fun and rewarding part of our business.
after i sent the link off i actually took the time to cruise through
the various projects, some of which i scarcely remembered.
these projects tend to come and go quickly.
and below are some excerpts from other writers' take on the process ...
so true here
below are some images selected from the link above
showing some of things we have fixed in the last 40+ years ... 
rereading these posts this rainy afternoon has been quite a trip for me ...
it's a long story
with a happy ending  
and how about this one?
we didn't have to do much, but it sure was fun having it here for a bit
someone spent some time on this one
and we spent some time on the one below
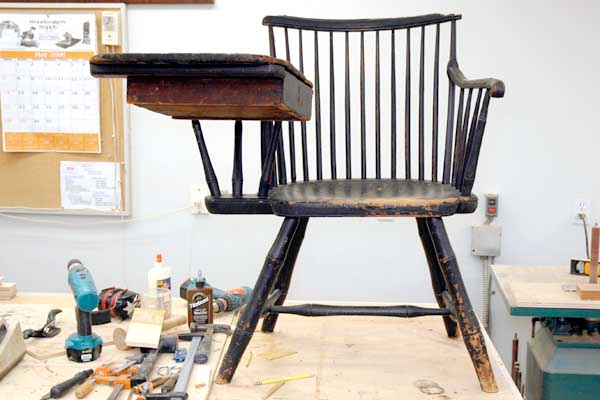
one of the finest writing arm windsors i have seen
all the original pieces were available
tah dah!  all in, all done
one more ...
we had to reattach the top to this 'papier mache' tilt top table
with the little scraps of abalone inlays in the oval border ...
who even knew there was such a thing?
ok, last one  scroll down


Friday, September 15, 2017

a nice repair

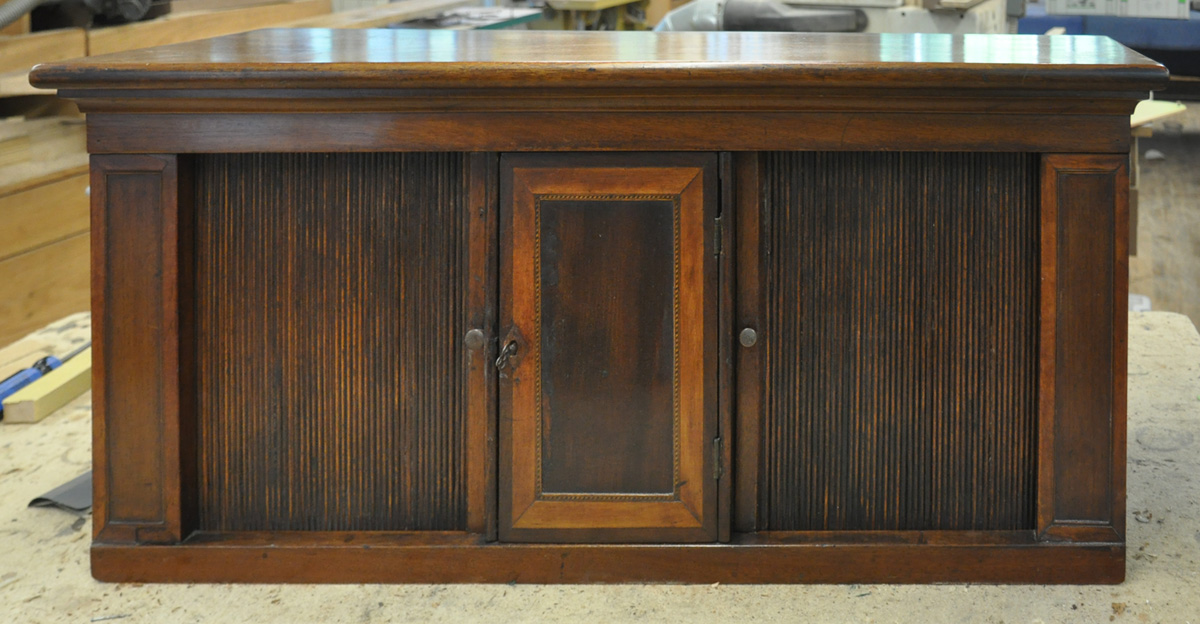
sweet little desk top in the shop for a tune up .. 
the tambour door on the right was in two pieces and of course,
would not come out of the case except if we removed the back of the cabinet.
                             like this .. lots of rusty and old different kinds of nails holding it on
the canvas backing was split on one of the five door parts
and when we removed it, there was some old newspaper too
for some reason ??
                                               hard to date it .. might be the twenties or 30s
we put a new piece of  canvas on the pieces with sandbags for weights 
because the door had a sections that was curved at the far end ..
aside from this proper family protrait we found inside,
there is an interesting thing happening with this cabinet ... 
an acquaintance called asking me to fix it a few weeks ago .. i definitely
know the person, but i didn't write anything down like the name or
number at the time since they said they would be dropping it off.  so, i went
off to golf last friday and there was this desk top sitting on a bench 
in the shop on saturday morning.
when the boys came in monday morning i asked whose it was and they said
someone's brother, with out of state plates, dropped it off and when trevor went 
to talk to him after he carried it into the shop, the gentleman was already driving away .. 
anyone recognize this?  i need some help here ..


Tuesday, January 26, 2016

restoration? ... repair? ... thoughts on time passing

well, this one was around for a looong time.  i mostly finished it up yesterday.  the oldest of the photos below are dated 7/10/13.  seriously.  we made a table for these folks in the spring of that year, and a few months later the husband dropped this table off, and told me 'no rush'.  big mistake.  let me just say kindly, that it was not in the best of shape ... click the photos to enlarge them ...
i have no idea why i didn't follow through and fix this one right off, except that i knew it would take a really long time to get it back to useful ... the main problem, (i speculate), was that the table was stored somewhere that was very damp, and the veneer on the bottom of the top came loose, allowing more moisture in.  while i can't find a picture, i definitely remember that the top was dry and cupped about 3/4 of an inch across the 18" width of it ...
so, out came the skilsaw, and i made some not quite all the way through skilsaw cuts about an inch and a half apart until i could very easily flatten it with a couple clamps and a straight edge.
at that point i put the top in the veneer bag with the original bottom veneer (you can see it in the background there) glued on to it .. that flattened it out and that's when i dropped the ball, likely intimidated by the anticipated time and risk involved in repairing the missing veneer.


so then recently, (the clients have commissioned another table), i went on to the patching, trying to find a piece of 'new growth' walnut that matched the grain of the apparently 'old growth' walnut of the original veneer.  since we had no idea of the table's origin, (italian? french?) i'm not even exactly sure what kind of walnut veneer the original veneer really is. the photo aggravates the color and grain match, and it is actually a little better and less obvious, (but obviously still obvious), in natural light.

as i was finishing up, there conveniently appeared a relevant article in the new yorker entitled ' The Custodians'.  i have taken the liberty of posting two excerpts from ben lerner's thoughful article below.  well researched, well thought out, and totally thought provoking.  a wonderful read for people like me who occasionally are called on to to rescue the old stuff. 

The Custodians

How the Whitney is transforming the art of museum conservation.


'lacunae' ... gaps .. missing pieces.  'coeval' .. living at the same time.
enjoy!

Friday, January 28, 2011

The Chest

Over the past five years or so, we taken on more repairs and restoration of worthy antiques for the folks in our area .... It's great work on a number of levels: it's a break from the routine; it gives us a chance to be heroes by saving or polishing items of, in some cases, extreme sentimental value; it's a quick project rather than something you work on for days or weeks ; and the work is often challenging and thought provoking. We've learned to try to 'do no harm' by doing as little as possible to get things back in shape. Over the last year and a half we have had the good fortune to work with a couple who suffered a pretty serious fire and have learned many techniques for cleaning smoke damaged furniture . The star of this post I have written about before. The client had it for a long time, having chosen it when his late grandmother's possessions were divied up.
Here's the only shot of it I have pre-cleaning ...
Here I'm about to start on the touch up ... We talked to about a million people about this piece ... It's old; as far as we could tell, no one has ever messed with the paintings; it's important to the client ... he got it from his grandmother and, though it's hard to photograph, in person you can clearly see his name (Chinn) and the date 1706, a year his ancestor married and built a large home in Virginia that still stands today. So, is it possible this chest has passed down on the male side of his family for over 300 years???? The client was floored when we found this. One dealer I spoke with felt maybe it was not quite that old....Others were not so sure ... Regardless, it was now an important family piece for sure ...
I have lightened the photo and changed the contrast, but here it is.... there are other writings on two of the other panels, but they are not as easy to translate.
Another view of it ...
After testing a small area of the paint (for about the third or fourth time), with a white paper towel and denatured alcohol, we rub coated the first panel with 'sealcoat', a dewaxed shellac.
That provided a barrier coat and I built and blended on top of that with three colors of latex paint on the same brush at the same time ... I often use this technique when recoloring antique finishes ...
dab it on ... smush it around and redab ... if you go too far, which I did a couple of times on this project, the barrier shellac coat allows you to 'erase' your mistakes by rubbing with alcohol to go back to the beginning ... recoat over the color when you're happy ..
I guess 'blot' is the right word. You kind of pounce it with a smushed up paper towel until it looks right.
The first end panel retouched ... note the difference between the side base and the front ...
Here the front is retouched on the right, but untouched on the left ...
The 'Chinn' end ..
The top looked like it might be a challenge, but we cruised through it to wrap it up ... When I delivered it yesterday, the client said it now looked better than it did before the fire, a high compliment for sure ...

For more information on our work repairing and restoring worthy antiques, see this link here... Or for two of our finest saves ... this link ...

Saturday, October 17, 2009

Antique Repairs and Restorations

Repairs ... We love 'em ... If they could only talk; then they'd be even more interesting .... This pair of tables came in one at a time with the idea that we only had to put a leg back on one of them and patch a broken corner. However, they came in with a bureau that was a basket case when it arrived and looked like a million bucks when it left .... We fixed and delivered that piece first and when the client saw how her bureau had been transformed, she sent us the mate to the table above with instructions to tune them up and refinish the tops, which had suffered some serious damages over the years. So, as we worked with them, we dreamed up their story ... Who knows? Here's what we think..... Click the pictures to enlarge them as we go ...

Here's the bureau ... When it came to us, it looked like it had been in a barn for quite a while ... The drawer supports had all collapsed and the drawers didn't run, more than half of the base was off, the moldings were flapping ... Backboards were missing ... Will did a good job getting it all back together. It took a few hours, but it was definitely worth doing ... When it left, it looked great. Here's the deal on the tables ...

The builder was a skilled craftsmen. The inlays are nicely done, the veneers on the aprons appear to be hand sawn, and the tops of the pair of tables are pairs of bookmatched boards, 1,2,3 center middle outside ... The boards match .... not an accident .

We opted for scraping rather then stripping ... We find when we strip we always have to do a lot of sanding and that kills some of the handmadeness of the surfaces ... scraping's better in our opinion if you can do it ... The finish was not original and it was thin and flaky and actually shot off the front edge of the scraper as I worked.

After we got the leg back on there were about 10 places on the aprons and drawer faces that needed patching or regluing ... The aprons were bricklaid in about 6 layers and then veneered with the grain vertical . The red arrow shows a leg reinforced with a pair of hinges !! We left them there. They worked and you have to honor the history ...
We patched in a bunch of missing pieces and recolored them to match

Here's an interesting thing .... The legs were all cut at the point where the arrow is and the legs that are below that point on the tables now have a different finish and are held on by short half inch diameter dowels (we know cause they wiggle and we fixed one that was broken off) and in some cases hinges ... It also looks like the detail that is on the legs at one time was also on the aprons and drawer fronts.

One had a broken corner and a rotten spot that needed patching

Luckily I had a piece of crotch walnut with similar figure to make a patch

All in, all done ... and ready for the next 50 years or so ...