
Well OK ... Another big claro walnut slab table. We've made quite a few of them now and there is more information
about them on my blog than a person could likely want to read. (If not, be sure to scroll to 'older posts'). But, we like them. They always seem to have this mysterious sense of substance to them when they are completed. The wood is dark and deep and totally unpredictable in its grain and color. We like the steel bases too. This one looks a little shinier in the picture above than it is in person. There was a little sunlight sneaking in the door when I took the picture and, reflected off the floor, it made the base look pretty impressive. Actually, it's clean, but not real reflective and is meant to match the 'zinc' counters in the client's kitchen ... Click the photos to enlarge them ....

A bird's eye view of this 48 x 120 x 3" thick slab ... We figure conservatively that the table weighs at least 400 pounds assembled and I am unable to pick one end off the floor without feeling like I might hurt something ... For shipping to Montana, the slab will unbolt from the base and the 5 part base will be disassembled.

This project has been going on for a month or so so I reloaded a few of the relevant pictures of the process. You can see the other posts in the 'claro slab tables' category to the right. Above is the raw slab before we trimmed it to width and length.

First step was to use my trusty 25 year old 3.5" Makita hand held planer to smooth the rough sawn top.

Then since we had other stuff going on in the shop, the preliminary planing and cutting was done at my garage. Easier than loading and unloading, and, with my old truck on it's way to the graveyard, we towed it merrily down the driveway with Sam's Saab, whistling while we worked.

We laid in a few strategic butterflies

And worked on the chairs that go with it at the same time ... They are a version of our
contemporary ladderbacks with a 'Danish cord' seat by
Sandy Sherman chair caning. Danish cord seats were popularized by
Hans Wegner in the 50's and 60's and are friendly and comfortable, though a bit labor intensive. The chairs are, like Windsors, more about the silhouette than the grain of the wood ...

Our typical base installation

A close up of the finish

The chairs in two views ...

The 160 nails per seat that it takes to organize the weaving. Fortunately for Sandy, Trevor was able to layout and rout the holes on the cnc so all Sandy had to do was hammer them in.

And in contrast, an updated photo of our 'skinny console' for comparison ... You can pick that one up with one hand ...
 Well OK ... Another big claro walnut slab table. We've made quite a few of them now and there is more information about them on my blog than a person could likely want to read. (If not, be sure to scroll to 'older posts'). But, we like them. They always seem to have this mysterious sense of substance to them when they are completed. The wood is dark and deep and totally unpredictable in its grain and color. We like the steel bases too. This one looks a little shinier in the picture above than it is in person. There was a little sunlight sneaking in the door when I took the picture and, reflected off the floor, it made the base look pretty impressive. Actually, it's clean, but not real reflective and is meant to match the 'zinc' counters in the client's kitchen ... Click the photos to enlarge them ....
 A bird's eye view of this 48 x 120 x 3" thick slab ... We figure conservatively that the table weighs at least 400 pounds assembled and I am unable to pick one end off the floor without feeling like I might hurt something ... For shipping to Montana, the slab will unbolt from the base and the 5 part base will be disassembled.
 This project has been going on for a month or so so I reloaded a few of the relevant pictures of the process. You can see the other posts in the 'claro slab tables' category to the right. Above is the raw slab before we trimmed it to width and length.
 First step was to use my trusty 25 year old 3.5" Makita hand held planer to smooth the rough sawn top.
 Then since we had other stuff going on in the shop, the preliminary planing and cutting was done at my garage. Easier than loading and unloading, and, with my old truck on it's way to the graveyard, we towed it merrily down the driveway with Sam's Saab, whistling while we worked.
 We laid in a few strategic butterflies
 And worked on the chairs that go with it at the same time ... They are a version of our contemporary ladderbacks with a 'Danish cord' seat by Sandy Sherman chair caning. Danish cord seats were popularized by Hans Wegner in the 50's and 60's and are friendly and comfortable, though a bit labor intensive. The chairs are, like Windsors, more about the silhouette than the grain of the wood ...
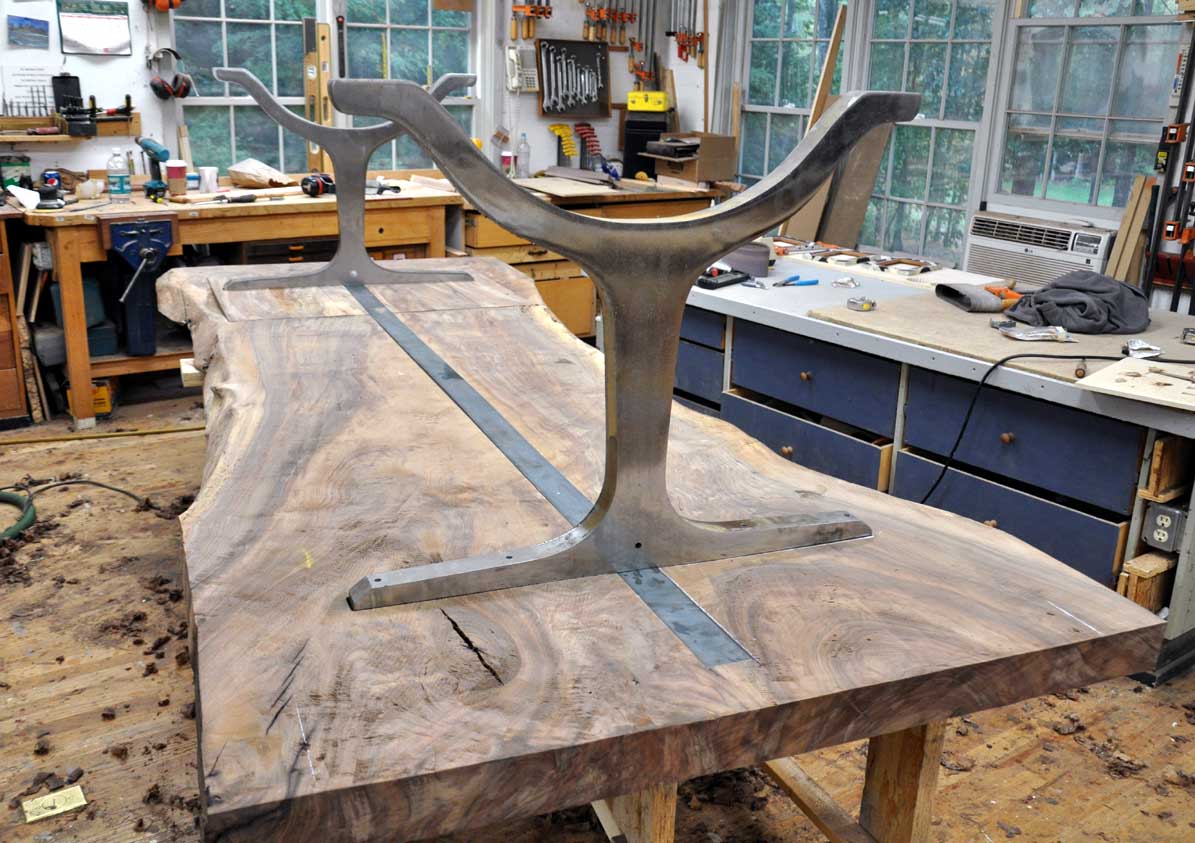 Our typical base installation
 A close up of the finish
 The chairs in two views ...
 The 160 nails per seat that it takes to organize the weaving. Fortunately for Sandy, Trevor was able to layout and rout the holes on the cnc so all Sandy had to do was hammer them in.
 And in contrast, an updated photo of our 'skinny console' for comparison ... You can pick that one up with one hand ...
10 comments:
I don't know why, but I just now am thinking, "man, that is a thick top." - in a good way, of course.
Nice work. Did you simply chisel out the top for the butterflies, or use some power tool?
Wow so nice collection of furniture even the picture are very good it's show entire process for to a table
living room sofas
NICE! Beautiful work!
Do you think you could talk a little bit about how you do your splines/butterflies?
They look so precise.
Wow! The size and finish looks amazing. I am building a similar (much smaller) table for myself but am having issues deciding on a finish. What finish did you use?
typically, on most of the tables you see, we use minwax fast dry poly, two coats of gloss, followed by a top coat of satin. then we sand out the nibs with 2000 grit and apply a wiping coat of the satin mixed with a little linseed and thinner and dryers. brush on, wipe off ... try a sample first. if we spray, we use ml campbell magnamax dull sheen two coats seems to look best. good luck,
dan
Great stuff. I see you guys like the power planer. Do you use it to get these slabs close to level but then use a large drum sander? You surface appears to be perfectly slat. I have no manual planing skills to get it absolutely flat. I do rent time on a 55" triple head drum sander.....so maybe I cheat.
hi dev .. sometimes we use a big sander, at berkshire products, like you describe (it is expensive), but on the bigger slabs, we typically just get them as flat as we can, using the power planers and winding sticks. once they are close to flat, we scrape them by hand using stanley #80 two handled scrapers and then sand them 100,120, 150, 180 using porter cable half sheet sanders. check the 'claro walnut slab tables" for more examples and info ... dan
Hi Dan,
You continue to make wonderful pieces! Quick question, do you sell your 1-1/2" thick legs separately?
Can you tell me the over height & width of those Claro Slab legs? I can't tell if they are 24" wide or 40" wide.
hi dev .. we can make them any size you like. a general discussion of prices and alternative designs can be found in my blog post of march 9th 2013.
here's alink you can copy and paste
http://www.dorsetcustomfurniture.blogspot.com/2013/03/what-kind-of-steel-base-can-i-have-on.html
the 1.5" thick shaker legs start at $3500. others are less expensive.
Post a Comment