Sunday, November 30, 2008

A Display Cabinet for a Dawn Wallace Belt

Update 11 30 08

Well, the Wallace Family Show is officially open. The case and belt are on display and all the items available are listed on the Long Ago website at the link below. Beautiful stuff ... Check it out if you have a minute ...
Close up of the completed case with the belt

On view at Long Ago & Far Away

Above, a section of Dawn's new belt
Every year, Betsy and Grant Turner of Long Ago & Far Away in Manchester, Vermont, host a show for their long time friends Denise and Samuel, Dawn and David Wallace. I always enjoy catching up with the Wallace family and seeing their invariably exciting new work. This year, I have the special treat of making a display cabinet for Dawn Wallace's new belt. This is a complex and wonderful piece designed so that some of it's individual parts can be removed and worn as pins or pendants seperately from the belt. We've been working on the case for a couple days now and I think we'll wrap it up this week. We tried to create a design that would enhance the belt's display but not compete with it. Since the belt has a sea theme, we took a shell design from a table I made several years ago, placed pairs of them in the corners of the door of the case and added a 1/16th inch line of abalone to complement the blue/green theme of the belt. We have still to complete the final sanding, finishing and polishing but we have worked out the particulars and are in the home stretch ....
Click the pictures to enlarge the images ...
This is the cabinet as of Friday, hanging on the wall with it's first coat of finish and the belt "Photoshopped" in to give us an idea of the completed concept..
Where we got the shell design
The vertical pieces of the door frame, with paua abalone lines from Stewart MacDonald (guitar supply) in a 1/16th " saw kerf. The shell inlays by Trevor are a mix of redwood and big leaf maple burl.

The case on the wall Friday. We used the closed version of this photo to Photoshop the picture below the text above.

Monday, November 24, 2008

Some Fine Metal Chandeliers

All in, all done ...

Sam is working on, (for him), a new thing in the metal shop ... his first electrified chandeliers. There are two the same, constructed from forged, threaded, welded and wrapped, steel and copper. Those two are finished, and there is a a third that is just getting underway that will have a single shade. Pretty cool ... Click the photos to enlarge ...
First shot at it .... before welding, it was edited by Sam and the client ..
to look like this ... better for sure ...
Then the intersections were wrapped with 8 guage 1/2 round copper
and painted,wired and hung ... voila'

After a half hour of pass the pencil (and the eraser) among three of us yesterday, .... Sam, the client, and me, this is where we ended up ... construction on this one is underway ...
ON site pictures soon ... We have heard they look great in the space ....

Friday, November 21, 2008

Build Your Own Pool Table

OK .. coming soon ... We'll be starting a pool table similar to one we made a few years ago. I think it will be our 14th or 15th since 1988 when I restored my first older table, intending that it would go in my basement. Sold that one and the next one too before I bought kind of a homely one for myself and I managed to hold on to that one. That was in 1990 when Sam was 8 and Will was 6. Needs new felt now... for the second time. Time flies .... Anyway, the one we're going to build is our first 7 footer, for a client on the Vineyard .... It will have a 'post and beam' base made from recycled barn beams ....... The beams just made it into the finish room last weekend and they are acclimating to the heat so there won't be much more to see for a week or so, but the process is interesting, and I know I'll enjoy writing about it as we go along. Not a table goes by that we don't consult the ultimate do-it-yourself article on building a pool table by Paul Bowman ... from Fine Woodworking Issue #75 ... check it out for yourself ... then click the pictures below to enlarge them ...


We made this 9 footer in 2005 and the 7 footer we will be starting soon will be similar in style...

Two hand hewn beams from a South Granville, NY barn frame circa 1850. The frame was reerected in a slightly different configuration and these beams became 'extras'. They will be used for the posts/legs and we will resaw some parts of them for the horizontal rails/beams of the base....

These rafters from the same frame will be used for the slate subframe and resawn to make the smooth wood rails and vertical 'blinds' which cover the edges of the slate and felt ... Beautiful, straightgrain, tight growth, most likely virgin timber ....

A couple of other tables we have built ... to see more .... go to the 'pool, poker, and game table' section of my website ...


This one won a Custom Woodworking Business magazine first place design award in (I think) 2005

Cherry and black paint, from 1989 ... still one of my 'classic' styles

Wednesday, November 19, 2008

The 'House Full of Stuff"

Those of you who have been reading my blog have seen a number of posts regarding a 'house full of stuff' that we have been working on since July. The owners and the designer have asked me to remove those posts due to privacy issues and I have agreed. In the meantime, to see another amazing and fascinating house that appeared this summer in Vermont magazine, and in 1997 in Architectural Digest, see the post directly below.

Monday, November 17, 2008

July/August Vermont Magazine

8/08
The current issue of Vermont Magazine has a really nice article about a wonderful house in Stowe, Vermont. It was designed by a Canadian architect, James Strasman and built in the mid 90's by Mary and Jim Connacher. Their vision was to round up some Vermont Furniture makers to supply the furnishings for their new house. They went around the state, visiting and designing, and I was one of the lucky furnituremakers selected for the project. Here are a couple of pages from the Vermont magazine article. The photos are by Carolyn Bates. The issue, I think, is still on the newstands. The house was also featured in Architectural Digest shortly after it was completed and that article was great as well. The photos from that article, naturally, were more about the architecture and if I can find my issue, I'll post a couple of those. Click the photos to enlarge ...
The Cover
Cover article title page
The room divider piece we made
Rick Schneider's stairway
A list of the makers

Garrett Hack's Sideboard
The images below are from an article in the November 1997 Architectural Digest with Syvester Stallone on the cover..
The architects name was JamesStrasman
Showing the main room from the opposite direction ... This shot also includes a half round table we made along the wall on the left
Our sideboard, Charles Shackleton's bench and Rick Schneider's stairway ...

Thursday, November 13, 2008

Deer Camp Windchimes


With rifle season fast upon us, be prepared by ordering one of Sam's special new 'Deer Camp Wind Chimes' for the back or front porch. Quietly soothing, back to nature sounds of clinking 30/30 shells .... Click the photo for a close up view....

You just can't beat the brassy sounds ..... and it'll go great with your new Vermont belt buckle. Call Sam today to order either at 802-325-2073 or 802-867-5541 or email him at sam@dorsetcustomfurniture.com ........ Immediate supply is (somewhat) limited ...

Wednesday, November 12, 2008

Second Concertina Hinge Game Table Update


11/12/2008 I knew this was going to be a long one. We're in the home stretch now. We have fabricated all the brass details, gotten the final finish sample approved, completed the joinery and are underway on the finishing. We decided to delay the leather work until all the construction work was completed and we could finish all the wood at the same time, even though it meant that the leather work would delay the delivery of the table. It just seemed safer and my clients were not in town to approve the finish sample ...soooo ... we're close ... The details on the brass feet are posted below ... the brass moldings will be installed and lightly shined after the finishing and assembly are completed ... click the photos to enlarge

open position

closed position with finished foot detail

gluing the burl to the aprons

see posts below for brass foot details

Friday, November 7, 2008

Forged Shaker Pegs


We had a request from one of our good clients this week for some forged Shaker pegs for a mudroom/entryway ... Sam whipped up a dozen and they came out real fine ...... Shown above in
blackened and natural steel ... Nicely varied and handmade looking .... Click photos to enlarge ..

Thursday, November 6, 2008

Cutting Brass on the CNC

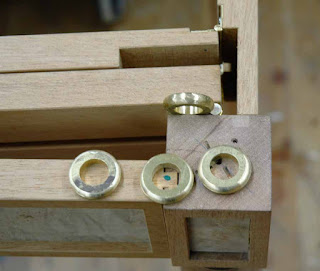
Well, we had to make some brass doughnuts the other day for the brass feet for the Concertina Hinge Game Table we are building. I was faced with drilling big holes, bandsawing and turning and sanding some small pieces of 1/4" brass. If it were a wood shape, I would step up the the cnc and cut it in about two seconds. We had cut some thin brass before while repairing an antique clock and I thought we might as well try the thick stuff. Once we figured out the feeds and speeds, Trevor made short work of it .... It's always great to discover a new use for the CNC..... Click the photos for better viewing ...
Trevor first cut the inside hole and the outside shape with a 1/4" super o bit leaving a 1/32nd skin on the bottom
Then he switched to a round over bit, cut the first side, routed a pocket into the spoil board, and, holding the doughnut down with a screw and washer, rounded the back side ... viola ... about 10 minutes, well spent. We're thinking of building a merry-go-round ...

A 'Distressing' Post

Sometimes clients ask us to 'distress' or 'antique' a piece of furniture. At first I was hesitant, but now, I often get downright enthusiastic about it. It's a real 'arty' process. My enthusiasm usually depends on the, what I would call, 'countryness' of the piece. I don't recommend it on high shine or formal pieces, but it seems to age new pieces that have a certain country flair nicely. Mainly we use a bunch of homeless keys on a strong string and a broken brick. Occasionally if we want to mimic old nail holes, we'll heat a piece of sharpened 1/8" round steel in the forge or with a torch and poke/burn some holes in the wood. That works best if we're already using recycled wood and have to add some additional character or (ahem, cough) repair a mistake ... 'Whatever works' is more or less our motto ... Fear is your main enemy here .... sandpaper's your friend ... Have at it ... Make some samples .... Work in layers ... distress a little, sand a little, finish a little, distress some more ... Click the photos for better viewing ...

Close up of a piece we made for the Greenbriar Hotel

The whole deal ...

Birds eye view of an oval side table
The process below and the tools above .. keys on a string and a broken brick

Distress then apply your first coat of stain

sand aggressively then apply your second coat of stain

We often apply the first coat of finish to see what's up, whack it some more and then add a darker gel stain .. then topcoat over that, polish it up and ship it ... It usually works out ..

The 'Birds Eye View' of the oval table above is a finished view of the piece in the process pictures above ...

Sunday, November 2, 2008

Turning Brass on a Woodturning Lathe


These brass details are part of the 'Concertina Game Table' post on 10/17 below. I first discovered I could turn brass on my Powermatic wood lathe a couple years ago while making some details for a custom mirror. You can probably use most any wood lathe that allows you to adjust the speeds. I'm not sure of the exact rpms, but we start at about the same speed that you would use to begin turning a rough spindle. Once you get the hang of the tool position, and if you have a variable speed lathe, you'll find the speed that's most comfortable for you. Will watched me turn the sample you see above and then after his first one, did the other three cleaner and faster than I could have. It's a knack that mostly involves tool angle, sharpness, control and tool movement speed. Getting your mounting holes centered in the blank is also crucial. On the feet below we started with 2" lengths of 1" round stock, drilled one end for the .44" tenon on the end of the leg and the other end of the brass blank with a 3.8 x 1/2" deep hole for a screw and the live center on the lathe tailstock. We turned it down to .9 on the large end and about .75 or so on the small end. We used a poplar short to mount the brass for the bulk of the turning and sanding and then did the final sanding and fitting on the real legs. Our small 1/2" round nose scraper is our favorite tool for roughing and using our new little Porter Cable belt sander while the brass is turning on the lathe makes quick work of the rough sanding .... Click the photos to enlarge them for better viewing ... Similar process to the square foot details on this bubinga table ...

Turning position

Shows the tool and tool angle and the conical live tail stock center

The drill press jig for predrilling the tenon and screw holes . The 1" hole is a tight fit and the rod is for driving the blank out from the bottom of the jig. The screw point engages the brass blank to keep it from spinning while you're drilling it. the resulting dot is turned off in the process.