Thursday, March 5, 2015

new steel and wlanut pool table

ok .. we've gopt another steel and wlanut pool table going here .. same as the one below from 2012, only an 8 footer instead of a full size 9 foot table .. it's going to be just as cool though .  
click the photos to enlarge them
we added an adjustable feature to the leg as the last building was not as level as some ...
lots of parts with angles
sam took all the measurements and angles from the cad drawing above and trevor whipped up some welding jigs for him on the cnc


end jig
long side

we assembled the base as soon as sam had it welded up.  we'll do the patina on the steel after the rail and cushion work are completed .. even after at least 15 tables, we occasionally refer to a fine woodworking article by paul bowman from 1989.

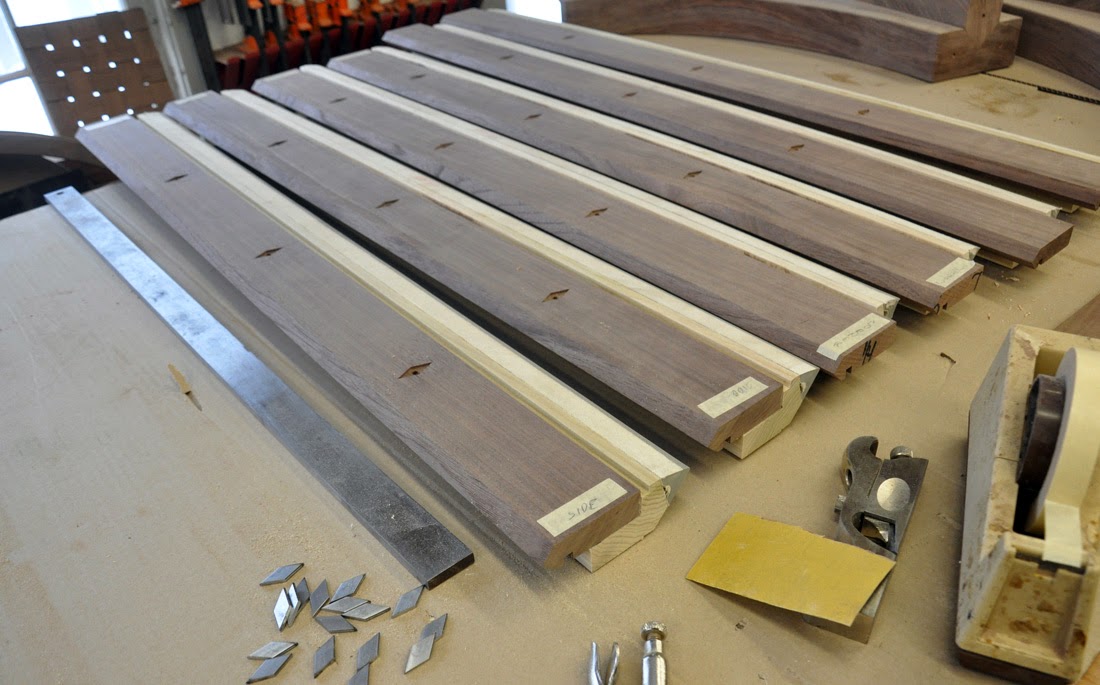
this client requested steel diamond sights to go with the base .. i started with some 1/8 by 1/2" steel and made a jig to cut the diamonds on a 45 degree angle .. it was fussy, but once i go tthe set up, it was easy to make the ones i needed, plus an extra set for next time.

chris and trevor worked on the rails and diamond inlays this week .. we're awaiting the arrival of the custom pockets, which could hold us up for a week or so .. we'll see
that gave us some time to work on the cue rack, and all it needs now is some final sanding and staining and some patina on the steel parts .. 


so more photos as we progress .. there is quite a long blog post on the first table, and this one will be more or less the same ... we like pool tables ... here's a link to some others we've made over the years and lots of links to other blog posts at the end of that post as well as in the category heading to the right called
i'm a pool player and we always enjoy a new challenge ...
the table was finished before the builder ...

new claro walnut slab tables

we finished the claro walnut slab table above just in time for the next rough cut slab to come into the shop.  even though the slabs are from different logs, they are remarkably similar in width, grain, and appearance.  fortunately, the new one is two and a half feet shorter than the last one, which was over 12' long and 4' wide when it got here.  3" thick too .. no picnic to move that one around for sure.
before trimming, on our supplier's website
click the photos to enlarge them ...
trimmed in photoshop for the client's approval
after the first coat of finish


while the first coat was wet
second coat on the top of the slab
the 1.5" thick legs drilled, tapped, and assembled by jim with their polish and clear coat ... ready to install
 all we had to do was move it out to the finish room .. it took all six of us .. we stood it on edge on the little cart, wheeled it to the front door, slid it into the back of the truck, drove it the 60 feet or so to the finish room and then mounted it on the legs below.
so we don't have to flip it with the legs on it, we use a pair of mdf 'vs' slightly taller than the legs ...
then we wedge and jack them up into the pockets routed into the bottom of the slab, bolt on the legs, and then pick up one end at a time to removed the mdf.  the whole table probably goes 500 to 600 pounds assembled.  we have no way to weigh it, so that's just a guess. kind of like a pool table ...
 last coat of finish after the leg install .. good to go.  to ship it, we'll reverse the process and lend our mdf vs to the delivery guy .. it's a good system that we have been using for a couple years now.
 and the next slab arrived at my friend's factory last friday ..
 we drew on it out down there, and rough cut it to width and length

this drawing shows width between the legs
and brought it into the shop for acclimating on monday .. makes a good worktable in the meantime
more on this table as we progress.
 gonna be a nice one!
see more of our claro walnut tables, visit this slide show

Tuesday, March 3, 2015

bob and the aarp

i was surprised to see one of my favorite musicians on the cover of my recent aarp magazine .. good for you bob .. it was a good read and i wish i had read it before i tried to carry a 14' white oak 2 x 10 down the garage stairs by myself a few weeks ago ... about half way down, i got kind of stuck and twisted and i definitely tweaked something in the muscle that picks up your leg to go up the stairs.  but, it was friday and i had a paddle tennis game, and that one was so good, we played again saturday, and then i have(had) a regular sunday morning game.  by monday i was almost a total cripple .. could hardly get in or out of the car .. it will be a month this friday since my stair incident, and i'm just starting to be able to put my pants and socks on standing up, and sit at my computer without tears coming to my eyes.  i'm learning bob, but slowly i admit ... thanks for the tip ...
get help or leave that stuff to the young guys ..

Monday, February 16, 2015

stuff you can do with a cnc router

in conjunction with my exploration of the possibilities/virtues of machine work vs handwork that i wrote about in a blog post last month, i have put together a slide show entitled 'stuff you can do with a cnc router'  ... here's a link to that slideshow...  within those photos there are links to my website or blog where further information is available .. there are also many post in the category trevor's cnc projects.  that link would be for the diehard curious, as there are over 40 blog posts there.  we've had access to this technology since 1997, and have had our own full size, 50" x 100" multicam since 2005.  prospective clients almost always stop to ask when they see it on the way to my office, 'what do you do with that?'  i've decided that it is easier to show than to tell them .. 230 example photos .. most with blog links in the caption .. 
it might take 15 minutes or less to scroll through them all ..

our standard technology quote is:
"technology ... it almost works" . 

we often use that quote when things don't go perfectly, but, in general, with the right operators and proper attention to drawing details and machine maintenance, this technology is incredibly efficient and reliable.


Sunday, February 15, 2015

slow learner .. the definitive design fee policy post

Back on Sunday, May 31st 2009, I wrote a post about a client I had just finished working with on the design for a custom coffee table with dragonflies and reeds inlayed in the top of it. Here is a link to that blog post. Let's just say it didn't go well for Dan.  In case you don't want to read my whining, here's a brief excerpt from what I wrote after that experience, summarizing my then and current thoughts on design fees:

"Here’s what I’ll do for free :

Have a meeting or two of reasonable length, say an hour or so, at my shop or at their house close by …. No Charge …. More than ½ hour travel time from my shop, meetings MAY involve travel time reimbursement. The client will be informed in advance and the charge will be assessed at my discretion, probably depending on how the meeting seems to go.

Provide concept sketches and one CAD scale drawing … No Charge

If design is ‘close’ but not finalized, I’ll provide a non binding ESTIMATE of the project’s cost including shipping and installation. No Charge

If we move on from there without, at that time, a formal agreement, I will request a non-refundable design fee that seems appropriate to the project at hand. (Our current design rate on 2/14/15 is $75.00/ hour)  If that fee is used up, we probably have a problem, and we’ll have to take it from there with a new, written and accepted, design fee agreement ….

I hope this is clear and that it will help both me and my customers to understand that design is not something that just 'happens' but is a sometimes complicated and time consuming process. And, time is really all we’ve REALLY got.. "


I don't think I would change much about that summary today.  And, until this past December, I have not had to request any design fees since 2009.  I will say though, that every time in the future that I do request a design fee, which is really, really only when I think it necessary, I will make sure that if someone gives me a design fee, that they understand my stated position on this. 

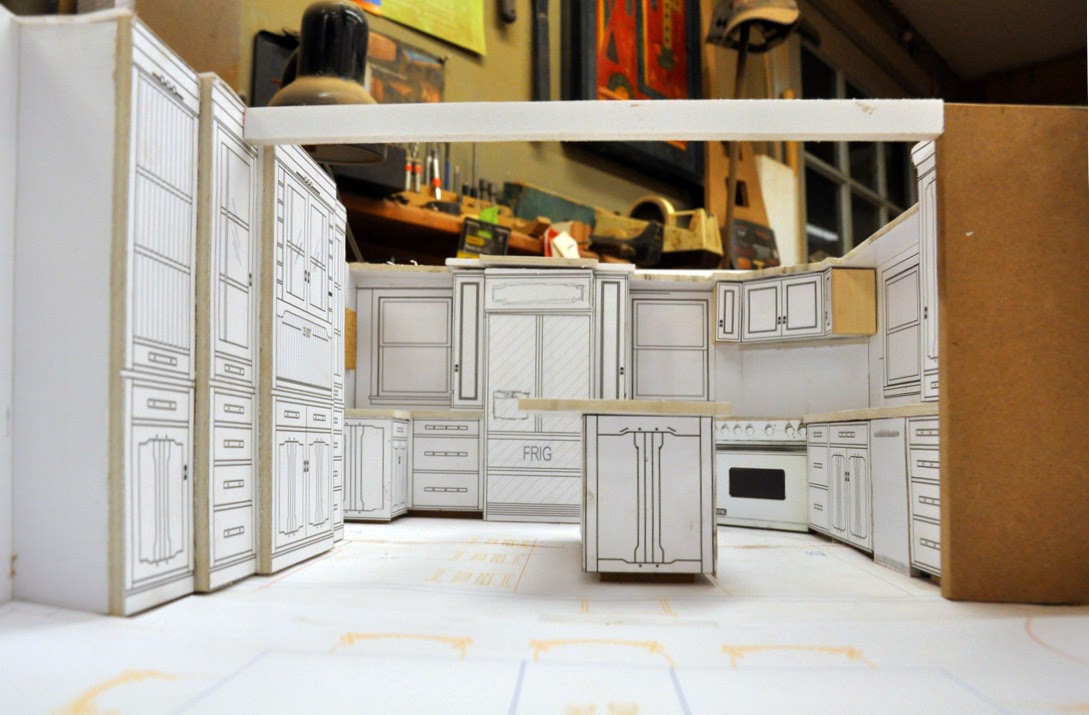
The prompt for this current posting was from a potential client who asked me to consider building for them a 'Greene and Greene' style kitchen with all the bells and whistles. Their budget, at first, seemed sort of reasonable, but since we had no drawings to bid from, and the drawings their kitchen designer provided were 'not what they wanted', if I wanted to consider doing the job, I would have to make drawings to bid from.  They offered a $1000. design deposit, which I thought was reasonable, and which the husband, obviously, took to mean I was totally committed to their project, would love their site and their contractor, and could do whatever design they wanted, whenever they wanted it, within their budget.  Well, after quite a bit of drawing time and back and forth by email, and a site visit to Boston to meet their contractor and actually see the space they were going to remodel, for a variety of reasons I will not go into here, (I'll invoke Will Rogers who once said "Never miss a good chance to shut up"),  I decided to withdraw.   Since I had spent quite a lot of time just understanding the space, which was very tight, and producing drawings and a quick model for the design meeting, and to estimate a total cost, I offered to settle for just the deposit, which was about 1/2 of the time I had spent on the project, not counting the overnight trip to Boston.  We had already discussed at our initial meeting that I do kitchen work only on a 'cost plus basis'.

The wife was fine with that, but the husband, not so much .. I spoke with the wife, and followed up with some post meeting suggestions to smooth the project execution, and didn't hear anything until almost a month later, last Wednesday night, when i received the email below:

Hi Dan,
     Sorry to take a couple of weeks to get back on this -- busy digging out.  We're not as good at dealing with so much snow as Vermonters!
     Let's focus on where we agree, i.e., that this won't be settled over email.  Glad for any thoughts you have on a resolution mechanism.  Is there a local trade group or business association up there that offers mediation or arbitration?  The default is filing a claim in Bennington County small claims court, which itself may be a good option all around -- inexpensive, informal, local for you.
Yours,
Johnathan

' inexpensive, informal, local for you '  ... Love it!  So breezy and informal !! and the snow!  
After fuming for a bit and talking to 'my closest advisors', I decided to return the client's entire $1000. deposit and get on with it.  Anything else seemed like a lose/lose from a business standpoint.  Taking a design deposit in the future?  I will list all the contingencies I can think of, have a reading of my policy above, and feel better about my chances of getting paid for at least some of my efforts, regardless of whether the project proceeds or not.

What I had to bid from, plus some 'not what we want' sketch up pictures.
The cad drawings I prepared for the meeting in Boston .. The model is at the start of this post.
Before picture ....
Live and Learn ...
Comments??

Thursday, February 5, 2015

yes, we do repairs

i've always felt that a craftsman should fix stuff.  particularly stuff that is important to people who really like the stuff that is broken.  it might be a family piece, like this one, and have sentimental value, or it could be just a nice piece of furniture with a problem here or there, looking for the good life.  also, as a 
craftsperson, where else are you going to get to work on pieces like this one if you automatically just say
"i don't do repairs"  .. i mean, check this out .. fantastic unrestrained inlay work .. probably 18th century?  definitely english, as its owner is.  anyway, this was an onsite job, particularly enjoyable because we have been discussing fixing it off and on for, literally, years. click the photo to enlarge it.
all done today ... check that one out.  ready for the next hundred years.
we've had a run of repairs lately .. here's a shaker like cabinet that had no pulls, a funky fastener on the latch, a big water streak down the front of it and some shelves inside which we removed and replaced with a rod for hanging clothes.  it's got some charm now.
and how often do you see a paper mache tilt top table?  never knew there was such a  thing.
love the scrap abalone oval, what would you call it?,  an applique?
this one had a painting fall on it .. that broke the paper base where the column screwed in. we also added a new catch where before the hinged block was screwed together so it couldn't flip up
technically, this wasn't a repair.  we just made a new base for the top.  the center of the table is a square of reclaimed french parquet floor.  the real thing!  hand hewn from solid wood, with a clever, rustic, mechanism that changes it from a 44 " square to a 62" round
here you can see the mechanism and the 'hand hewn' nature of the original floor
tah dah!  the top is darker, and the base is lighter, in real life ... overhead florescent lights ..
another nostalgic funky family piece .. had a big crack in the side and back, and the two front feet and one of the back feet were loose and had to be removed and reset.
haven't seen it yet with all the drawers.  only one drawer needed work
and this piece ... holy moly !  braziliab rosewood danish modern, damaged in shipping.  another onsite repair
cool piece ..
loved the interior bar detail and and way they cut the doors with the angles on them..
only the left one is open enough to see that.
better now, not perfect, but better
and we recently did six of these .. removing worn out brass casters on the front legs,
and turning new balled feet for the front legs
this is the connector from the trestle table below

as you can see in the photo below, the wedge grounded out on the edge of the hole before the table tightened up.  we squared up the inside edge and made new wedges.  it's solid as a rock now.
we also added a foot to each end to make it a 12' table
and we're working slowly on the doors below ... engineering a frame to hang them .. interesting challenge. they are too short, and too wide for the hole.  i have a plan ...
and we've got a very cool 12 foot walnut table going too .. more on that later

almost forgot this one ... it had a very clever sliding dovetail joint between the back leg and the 1/2" thick top rail.  had to trim off one side and reglue .. should be fine .. it's part of a daily use kitchen set ..